How to Fix a Toilet That Won't Flush A Practical Guide
- Luke Yeates
- Oct 23, 2025
- 13 min read

Nothing stops you in your tracks quite like a toilet that refuses to flush. It’s one of those household moments that sends a little jolt of panic through you, whether you're in a modern flat in Eastbourne's Sovereign Harbour or an older Victorian terrace in the town centre.
The good news? More often than not, the fix is surprisingly simple. Usually, it's just a matter of having a quick look inside the tank to reattach a chain or tweak the water level. Most of the common flushing problems can be sorted in minutes without any special tools.
Your First Steps For A Non-Flushing Toilet
When your toilet won’t do its job, it’s easy to assume the worst. But before you grab the phone to call a plumber, just take a breath. A few calm, logical steps can often solve the problem right then and there.
Over the years, we've handled countless service calls at Harrlie Plumbing and Heating all across Eastbourne—from modern flats near the Sovereign Harbour to beautiful old Victorian homes in Meads Village—and honestly, we’ve found that homeowners can fix the majority of these issues themselves.
Prevent a Puddle Before You Do Anything Else
Your absolute first move is to stop any more water from getting into the toilet. You don't want a simple fix turning into a soggy mess on your bathroom floor.
Look for the small isolation valve on the pipe coming out of the wall behind the toilet. A simple quarter-turn should shut off the water supply. If you can't find it or it's seized up, you'll need to shut off your home's main water supply. Knowing how to do this is a critical skill for any homeowner, and our guide on turning off your water main walks you through it step-by-step.
With the water off, you can safely lift the cistern lid to see what’s going on inside. Don't worry, the water in the tank is perfectly clean.
This quick decision tree will help you figure out if your problem is in the tank or further down the drain.
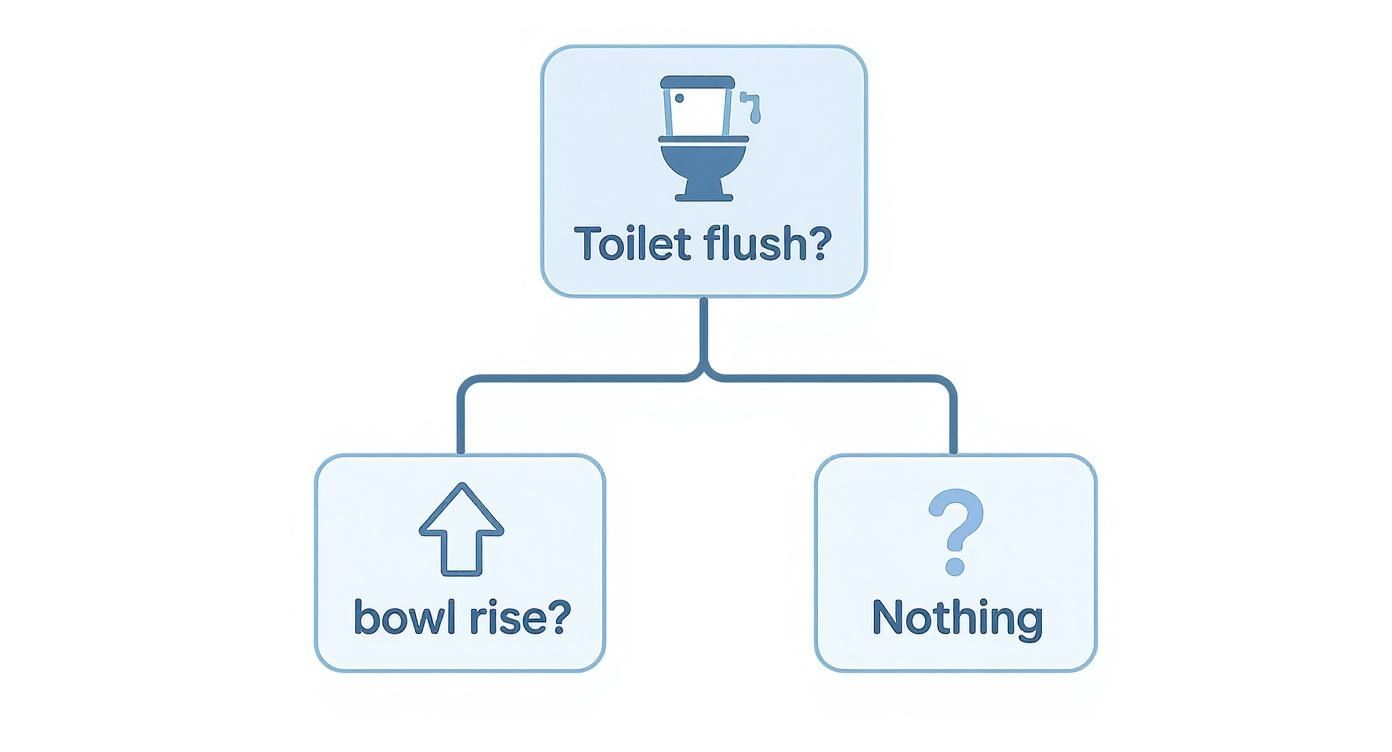
As the infographic shows, what happens (or doesn't happen) in the bowl is your biggest clue. If the water level rises, you're likely dealing with a clog. If nothing happens at all, the culprit is probably one of the parts inside the tank.
A Quick Diagnosis Table
To make things even easier, I've put together a table based on the calls we get most often here in Eastbourne. Use it to quickly match what you're seeing with the likely cause.
What You See or Hear | Most Likely Cause | Your First Action |
|---|---|---|
Handle is loose or floppy | Disconnected chain or handle arm | Reconnect the chain or tighten the handle nut inside the tank. |
Nothing happens at all | The flapper isn't lifting | Check the chain for slack or disconnection. |
Water rises in the bowl | A clog in the toilet or drain | Grab a plunger before trying to flush again. |
A weak, partial flush | Low water level in the tank | Adjust the float to allow more water in. |
Water continuously runs | Faulty flapper or fill valve | Check that the flapper is sealing properly. |
This table should help you pinpoint the issue in no time, giving you a clear starting point for your fix.
In the UK, a toilet that won't flush is a very common plumbing headache. It’s usually down to a faulty flapper, a misaligned float valve, or a broken handle. If you do need to call in a professional to repair or replace these parts, you can expect the cost to be somewhere between £200 and £600, depending on what needs doing. Seeing those numbers really shows why a little DIY effort is well worth it
A Look Inside Your Toilet's Cistern
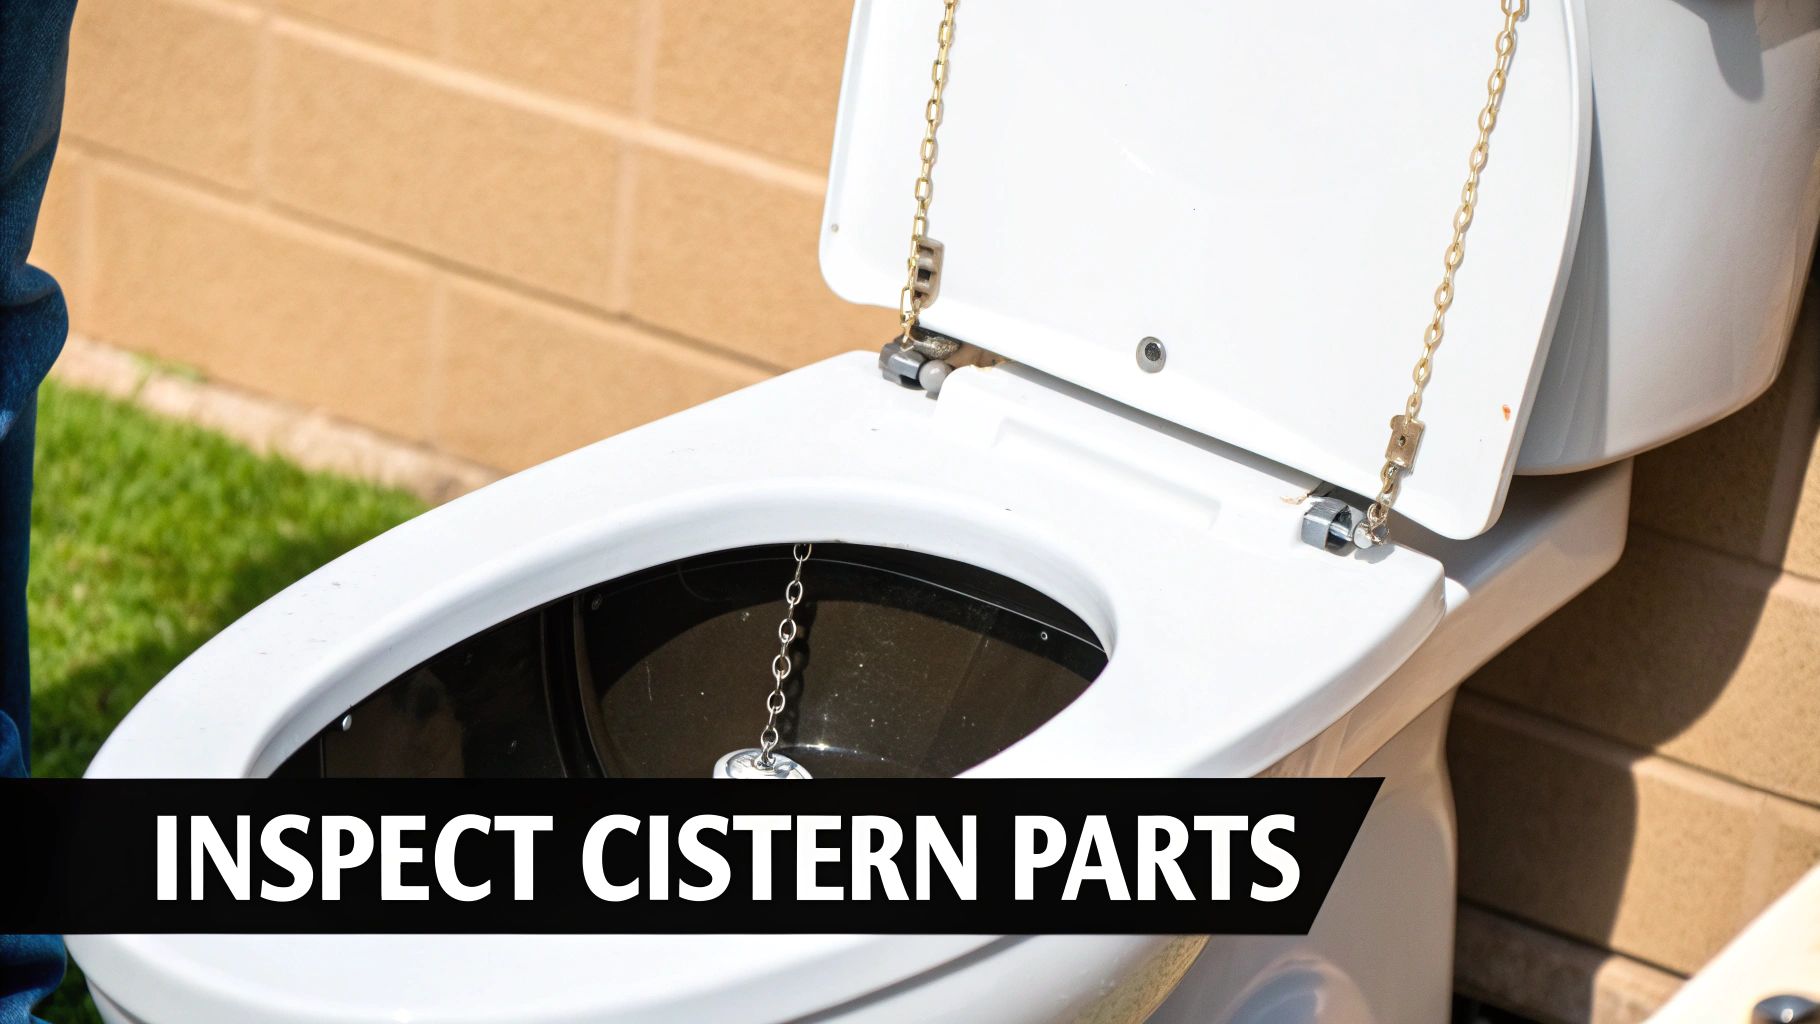
With the lid carefully placed aside, you're now looking at the heart of your toilet's flushing system. It might seem like a confusing jumble of plastic and metal at first, but it’s actually a surprisingly simple machine with just a few key components working together.
At Harrlie Plumbing and Heating, we often find that a quick visual check is all it takes to spot the problem. Understanding these parts is the first step in figuring out how to fix a toilet that won't flush, turning what feels like a major headache into a simple DIY task.
Key Players Inside the Cistern
Let's break down what you're actually seeing. These components are responsible for every successful flush, and when just one of them acts up, the whole system can grind to a halt.
Flush Handle and Lever: The handle on the outside is connected to a lever on the inside. Pushing the handle lifts this lever, which in turn pulls up the chain.
Lift Chain: This small chain is the vital link between the handle’s lever and the flapper. Its length is crucial; too much slack and it won’t lift the flapper, too little and it can cause constant leaks.
Flapper: This is the rubber seal sitting at the bottom of the cistern. The chain lifts it to release a torrent of water into the bowl, and it drops back down to seal the tank so it can refill. Simple, but effective.
Fill Valve: Also known as the ballcock, this is the tall mechanism that refills the tank with water after you flush. It’s designed to shut off automatically once the water reaches the correct level.
Float: Connected to the fill valve, the float (which can be a ball or a cup) rises with the water level, signalling to the fill valve when it’s time to stop filling.
Overflow Tube: This is an essential safety feature. The tall pipe ensures that if the fill valve ever fails, any excess water drains safely into the bowl instead of all over your bathroom floor.
A simple visual inspection can often diagnose over 80% of common flushing mechanism failures. Issues like a disconnected chain or a dodgy flapper are immediately obvious once you know what you’re looking for.
Common Problems You Can Spot Instantly
Now that you know the parts, you can play detective. From our experience dealing with plumbing issues across Eastbourne, from the newer builds in Shinewater to the older Edwardian properties, these are the most common visual clues we come across.
Is the lift chain dangling uselessly in the water, completely disconnected from the handle's lever? This is hands-down one of the most frequent and easiest fixes. Just re-hook it onto the lever arm, and you’re likely back in business.
Next, take a look at the flapper. Does it look warped, brittle, or is it not sitting flush against the opening? Over time, especially in hard water areas like we have here in Sussex, these rubber seals can degrade and fail to create a proper seal. This often leads to a weak flush or a toilet that won't stop running.
Another critical thing to check is the water level. The water should sit about an inch below the top of the overflow tube. If it’s too low, you simply won't get enough power for a proper flush. This is often caused by a waterlogged float that’s sitting too low or a fill valve that needs a slight adjustment. A low water level is a classic sign of a toilet that won't flush properly.
Getting to Grips with Common Flushing Mechanism Issues
Once you’ve pinpointed the problem part, it’s time to get your hands dirty. The good news is that most of these common repairs are surprisingly straightforward. You can usually get them sorted in under an hour with just a few basic tools—sometimes none at all.
You really don't need to be a seasoned DIY expert to tackle these jobs. Just follow a few clear steps, and you’ll have your toilet back in working order, saving yourself the cost of a professional call-out. Plus, there’s a real satisfaction in fixing it yourself.
How to Reattach and Adjust the Lift Chain
One of the most frequent culprits we find at Harrlie Plumbing and Heating is a disconnected lift chain. It’s a tiny component, but it’s the vital link between your flush handle and the flapper. When it fails, absolutely nothing happens when you press the handle.
If you peek inside and find the chain dangling, the first step is simple: just re-hook it onto the flush handle's lever arm. The more crucial part, however, is getting the length just right.
Too much slack: A chain that’s too long won't lift the flapper high enough to start a proper flush. You'll end up with a weak, swirling action that doesn't clear the bowl.
Too little slack: If it’s too tight, the chain will hold the flapper slightly open, preventing it from creating a seal. This causes a constant, quiet leak from the cistern into the bowl and is a classic reason for a toilet that won't stop running.
You’re aiming for just a tiny bit of slack—about one or two links' worth is perfect. This ensures the flapper can seal completely after a flush but will still lift fully when the handle is pressed.
Replacing a Worn-Out Flapper
What if the chain is fine, but you’re still getting a weak flush or a constantly running toilet? The flapper itself is the next logical suspect. Over time, these rubber seals can warp, crack, or become brittle, losing their ability to hold a seal. This is especially common in hard water areas.
In places like Eastbourne, the high mineral content in the water can seriously shorten the lifespan of rubber toilet parts. A flapper that might last five years in a soft water region may need replacing every two to three years here.
To replace it, start by turning off the water supply at the isolation valve and flushing the toilet to empty the cistern. The old flapper usually just unclips from two small pegs on the overflow tube. Clip the new one on in its place, reattach the lift chain, and you're good to go.
Adjusting a Sticking or Misaligned Float
A powerful flush depends entirely on having the right amount of water in the cistern. If the water level is too low, it’s often because the float isn't signalling the fill valve correctly. Limescale buildup, a common headache with our local water here in Eastbourne, can cause the float mechanism to stick or seize up.
For older toilets with a traditional ball float, you can often just gently bend the metal arm it's attached to. Bending it upwards raises the ball's resting position, allowing more water in. For more modern toilets with a cup-style float, you'll typically find an adjustment screw or a clip you can slide to set the fill level.
Your goal is to have the water level sit about one inch below the top of the overflow tube. This gives you the maximum volume of water for a powerful flush without any risk of the cistern overflowing. Nailing this adjustment is a key step in learning how to fix a toilet that won't flush properly.
These mechanism fixes are incredibly common. Nationally, plumbing professionals report that non-flushing toilets represent about 15-20% of all urgent repair calls, which just goes to show how often these simple parts fail. Understanding these straightforward repairs can save you both time and money. You can discover more insights about the UK toilet repair market and see just how frequent these issues are.
How to Clear a Stubborn Toilet Clog
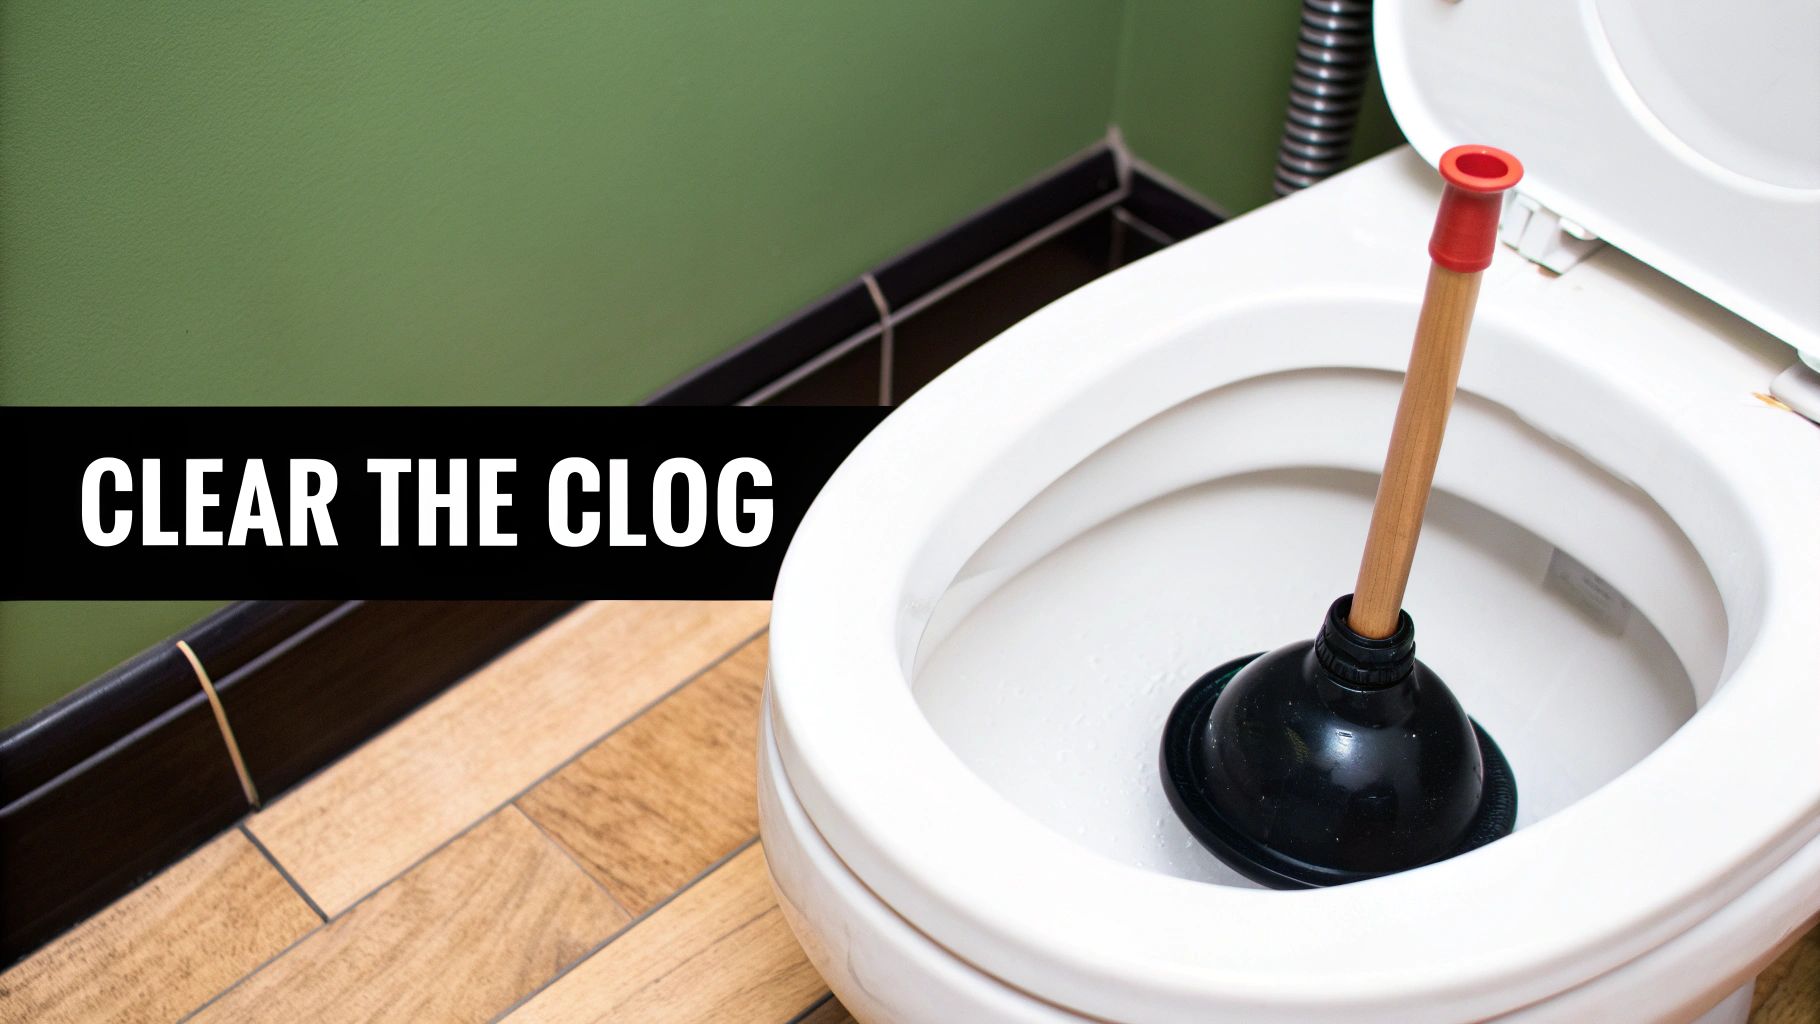
So, you’ve lifted the cistern lid, checked all the bits and pieces, and everything seems to be moving as it should. Yet, when you flush, that water level still creeps ominously upwards. This tells you the problem isn’t with the flush mechanism itself. You’re looking at a good old-fashioned clog.
Whatever you do, don't keep flushing! That’s the quickest route to a very soggy, very unpleasant bathroom floor. Instead, let's grab the right tools and go through the proper techniques to get things moving again, safely and without making a mess.
Mastering the Plunger Technique
Your plunger is always the first tool to reach for, but how you use it really matters. Not all plungers are the same; for a toilet, you specifically need a flange plunger. This type has a smaller rubber lip that folds out from the main cup, and it’s designed to create a tight, perfect seal over the toilet’s drain hole.
Before you even start, check there’s enough water in the bowl to completely submerge the rubber cup of the plunger. A common mistake is trying to plunge a half-empty bowl, which just sloshes air around instead of putting pressure where you need it.
Pro Tip: Your first push should be a gentle one. This slowly gets the air out from under the cup without splashing dirty water everywhere. Once you feel you have a solid seal, you can begin plunging with firm, powerful up-and-down thrusts. This creates the hydraulic force needed to dislodge whatever is stuck.
When the Plunger Fails Enter the Toilet Auger
If you’ve given it a good go with the plunger and the water still refuses to drain, it’s time to escalate to a more specialised tool: the toilet auger. You might have heard it called a plumber's snake. It's essentially a flexible cable made specifically to navigate the S-bend of a toilet without scratching the delicate porcelain.
Using one is pretty straightforward:
Carefully guide the end of the cable down into the toilet drain.
Turn the handle clockwise, which extends the cable further into the pipe until you feel it make contact with the blockage.
Once you’ve hit the obstruction, gently move the auger back and forth while still turning the handle. This should either break the clog apart or hook onto it, allowing you to pull it back out.
This is a much better, safer option than reaching for a straightened coat hanger. Trust us, that’s a surefire way to leave permanent scratches on the inside of your toilet bowl.
A Strong Word of Caution on Chemical Cleaners
It can be really tempting to just pour a bottle of aggressive chemical drain cleaner down there and hope for the best. Based on our professional experience here at Harrlie Plumbing and Heating, we strongly advise against it. Many homes in Eastbourne, especially the lovely older properties, have pipework that has seen better days.
Harsh chemicals can cause serious corrosion and damage to older pipes, quickly turning a simple clog into a much more complex and expensive leak repair. A much safer bet is to try a mix of hot water and washing-up liquid to help lubricate the blockage. For more tips on this, you can have a look at our guide on the best ways to unblock a drain. It’s always worth trying these gentler methods first.
Knowing When to Call a Professional Plumber
There's a real sense of satisfaction that comes from fixing something yourself, but with plumbing, knowing your limits is just as important as knowing how to use a wrench. Some toilet troubles are more than just a simple fix; they’re red flags signalling a deeper issue that needs an expert eye. Continuing to poke and prod at the wrong problem can quickly turn a small inconvenience into a major headache, complete with water damage and a much bigger bill.
We've seen it happen time and again at Harrlie Plumbing and Heating. A well-intentioned DIY repair in areas like Sovereign Harbour ends up causing a significant leak. Trust me, recognising when to put the tools down and pick up the phone is the smartest move you can make to protect your home.
The Clear Signs You Need an Expert
If you find yourself facing any of the following situations, it's time to stop what you're doing and call for professional help. These issues usually point to problems that go well beyond a simple mechanism failure or a standard clog.
Persistent Leaks You Can't Trace: See water pooling around the base of the toilet but can't find where it's coming from? This often points to a failing wax seal—a messy, tricky job that's best left to a pro.
The Toilet Keeps Running: So you've adjusted the chain and checked the flapper, but the toilet just won't quit. This could mean a faulty fill valve or a more complex pressure issue that requires a proper diagnosis.
Cracks in the Porcelain: This one's a big deal. Even a hairline crack in the bowl or cistern compromises the toilet's integrity and is basically a flood waiting to happen. Don't risk it.
The Auger Won't Clear It: If you’ve tried a toilet auger and it’s not breaking through the blockage, the problem is likely much further down the main drain line. This could involve anything from tree roots to a collapsed pipe, and that's definitely not a DIY job.
Knowing when to call for help is a crucial part of any home repair. Forcing a fix or ignoring a serious symptom can lead to much more extensive—and costly—water damage repairs down the line.
With the rise in home renovations across the UK, more people are upgrading their bathrooms, which often brings underlying issues with ageing plumbing systems to the surface. In fact, the UK Houzz & Home Report shows that a huge number of homeowners prioritise bathroom fixes specifically because of leaks and flushing failures. You can read the full report on UK home renovation trends to see just how common these problems are.
When a toilet issue does require professional attention, knowing about things like effective local SEO strategies for plumbers can help you quickly find a reputable service in your area. For those local to us, our team is always ready to lend a hand, and you can check out our guide on finding a reliable plumber in Eastbourne for more practical tips.
Your Top Toilet Repair Questions Answered
Even after going through the common fixes, a few specific questions always seem to pop up. Here at Harrlie Plumbing and Heating, we handle calls from all over Eastbourne, and we’ve noticed the same queries come up time and time again. Let’s get those last bits of confusion cleared up.
Why Is My Toilet Handle Loose, But It Won’t Flush?
A wobbly or floppy handle that doesn’t do anything when you press it almost always points to one thing: a disconnected lift chain inside the cistern. That little chain is the vital link between the handle's lever and the flapper at the bottom of the tank.
Nine times out of ten, the chain has simply slipped off the lever arm. This is an incredibly common issue, and the good news is you probably won't need any tools. Just lift the cistern lid off carefully, have a look inside, and you should be able to re-hook it in seconds.
Clog or Mechanism: How Do I Know What's Wrong?
This is a really important one, and figuring it out first will save you a lot of hassle. There’s a very straightforward way to tell the difference between a blockage and a mechanical failure.
You've got a clog if: You push the handle, and the water in the bowl rises ominously towards the rim but doesn't go down.
It’s the mechanism if: You push the handle and absolutely nothing happens. You might get a weak trickle, but there’s no proper flush.
If the water is rising, your first move is to grab a plunger. If nothing is happening at all, your next step is to take the cistern lid off and see what’s going on inside.
Knowing whether you're dealing with a clog or a broken part is the most critical first step. It tells you which tools to grab and, more importantly, stops you from making a huge mess by repeatedly trying to flush a blocked toilet.
Can I Replace Toilet Parts Myself?
For most homeowners, replacing internal bits like the flapper or even the entire fill valve assembly is a perfectly manageable DIY job. You can find universal replacement kits that fit the vast majority of standard toilets at any local hardware shop.
The most important steps are to turn off the water supply at the little isolation valve behind the toilet and then flush to drain the cistern completely before you start unscrewing anything. If you’ve got a very old loo or just aren't feeling confident, calling in a professional is always the safest bet to avoid any leaks or accidental damage.
For any toilet trouble that’s more than a simple fix, or for those jobs you’d just rather leave to an expert, our team at Harrlie Plumbing and Heating is always here to help. From stubborn clogs to full bathroom installations, we provide reliable, professional service across Eastbourne and the surrounding areas. Don't let a dodgy loo disrupt your day—get in touch with us for a free quote and fast service.

Comments