How to Drain a Radiator System: A Homeowner's Practical Guide
- Luke Yeates
- Jan 24
- 16 min read

Draining your radiator system isn’t just a job for the pros. It boils down to a few key stages: switching off your boiler, letting the system cool right down, finding the drain-off valve, and then carefully managing the water as it flows out. Getting this right means you can safely remove a radiator for decorating, perhaps in your Victorian terrace in the Old Town of Eastbourne, or replace a dodgy one without a mini-flood on your hands.
Your Essential Radiator Draining Toolkit and Plan
Knowing how to drain a radiator system is a core skill for any proactive homeowner, especially when you’re planning to decorate or you've got annoying cold spots that just won't go away. Think of this guide as your project blueprint, turning what seems like a daunting job into a totally manageable task.
A proper drain-down is crucial for the health of your boiler and pipes. At Harrlie Plumbing and Heating, we often see issues in Eastbourne properties, from Meads to Hampden Park, that could have been sidestepped with some basic maintenance. Getting it right starts with a solid plan and having all your tools ready before you even think about touching a valve. This preparation is the secret to a smooth, leak-free job.
Why Draining Your System Matters
Regular maintenance is vital for efficiency. In the UK, there are over 23.5 million homes with wet central heating systems, housing around 190 million radiators. That's a lot of pipework!
For homeowners in Eastbourne and the surrounding areas like Hastings and Bexhill, a full drain-down every 5-7 years can prevent common headaches like cold spots caused by sludge. This gunk can affect up to 30% of older systems, making your boiler work harder than it needs to. You can read more about UK radiator market trends to see just how common these systems are.
Pro Tip from Harrlie Plumbing and Heating: When the water finally drains out, have a good look at its colour. If it's black and sludgy, that's a tell-tale sign of internal corrosion. We see this a lot in the hard water areas around Eastbourne. While a drain-down helps, you might need a professional power flush to really get your system back to peak performance.
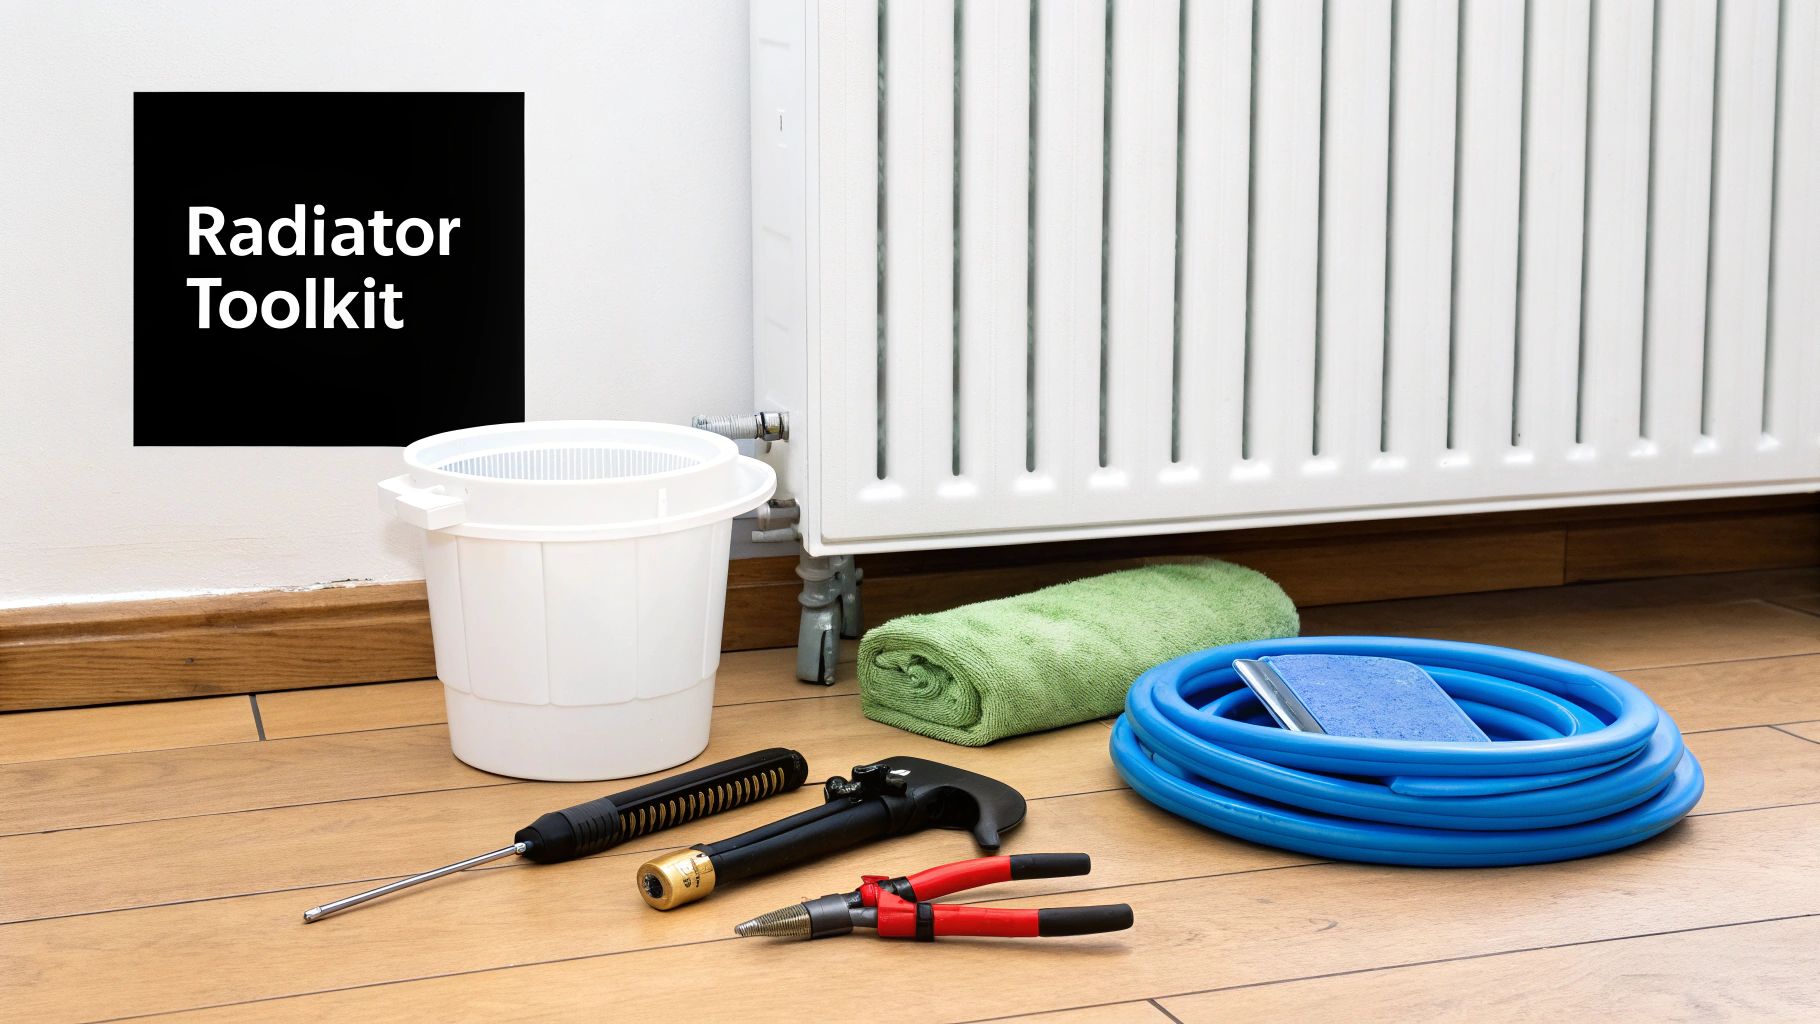
Assembling Your Tools and Supplies
Before you start, gathering your toolkit prevents those mid-job scrambles for a spanner you forgot. Having everything within arm's reach makes the process so much simpler and cleaner.
Gathering your tools and running through safety checks first prevents headaches later. Here's a quick reference for everything you'll need.
Essential Tools and Safety Checklist | ||
|---|---|---|
Item | Purpose | Key Tip |
Radiator Bleed Key | For letting air out of the radiators to help the water drain freely. | Keep it somewhere safe; they’re notorious for getting lost! A flat-head screwdriver sometimes works in a pinch. |
Adjustable Spanners or Grips | For turning valves and nuts that might be stiff from years of disuse. | Have two on hand—one to hold the valve steady and one to turn the nut, preventing pipe strain. |
Hosepipe and Jubilee Clip | To securely attach to the drain-off valve and direct water outside. | The Jubilee clip is non-negotiable. It stops the hose from popping off under pressure and flooding the room. |
Buckets and Old Towels | For catching any drips and protecting your floors. | You can genuinely never have too many old towels. Put them under every joint you plan to loosen. |
Protective Sheets | To shield carpets and flooring from dirty water stains. | Plastic dust sheets are ideal, as they won’t let any spills soak through to the floor below. |
Once you’ve got all your gear laid out, you’re in a much better position to tackle the job without any last-minute panic. A little bit of prep goes a long way.
Preparing Your Heating System for Draining
Before a single drop of water leaves your pipes, solid preparation is the difference between a clean, successful job and a frantic dash for more towels. This stage is all about safety and setting yourself up for an easy drain-down. I've seen it many times at jobs in Eastbourne—rushing this part is a common mistake that can lead to scalding or a very messy clean-up.
First and foremost, you need to completely power down your heating system. Head to your boiler and turn it off at the main switch or the isolation switch on the wall nearby. If you have a hot water cylinder with its own immersion heater, make sure that’s switched off too. This isn’t just about the boiler; it’s about making the entire system safe to work on.
Letting the System Cool Down
Once everything is off, you have to let the water in the radiators and pipes cool down completely. Central heating water can be incredibly hot, often well over 60°C, which poses a serious scalding risk. We always recommend waiting at least one to two hours to be absolutely certain the water has reached a safe, cool temperature before you even think about touching a valve.
A simple test is to briefly touch a pipe near one of your radiators. If it feels even slightly warm to the touch, give it more time. Patience here is a non-negotiable safety measure.
Identifying Your Heating System Type
Next up, you need to know exactly what kind of central heating system you’re working with, as the prep steps differ slightly. This is particularly relevant here in Eastbourne, where we at Harrlie Plumbing and Heating service everything from modern new-builds in Sovereign Harbour to older Victorian properties with their original systems.
Sealed Systems (Combi/System Boilers): These are the modern, pressurised systems you see in most homes now. You'll recognise them by the pressure gauge, usually on the front of the boiler. For these, the preparation is straightforward—once it's off and cool, you're pretty much ready to go.
Open-Vented Systems (Conventional Boilers): Often found in older homes, these systems have a large cold water storage tank and a smaller 'feed and expansion' tank, typically tucked away in the loft. For these, you must isolate the water supply by shutting off the valve that feeds this smaller tank. This is usually a gate valve (which looks like a tap with a wheel) or a simple stopcock.
Understanding your setup is crucial. If you're unsure, you can learn more about the differences and discover what is a sealed heating system in our detailed guide. Getting this right prevents the system from continuously refilling itself while you're trying to drain it—a frustrating mistake to make!
Locating and Prepping the Drain-Off Valve
Now it’s time to prepare for the main event. You need to find the lowest drain-off valve (or drain cock) in your system. This is almost always on a ground-floor radiator or on the pipework at the lowest point of your house. For many Eastbourne homes, this might be in a downstairs loo or a utility room.
Lay down your protective sheets and old towels around this valve. Even with careful work, some drips are pretty much inevitable. Firmly attach your hosepipe to the drain-off valve's nozzle and run the other end outside to a suitable drainage point. Just make sure it’s not draining into a neighbour's prize-winning flowerbed!
I highly recommend using a Jubilee clip to secure the hose onto the valve. This small metal band is incredibly important—it stops the hose from popping off under the pressure of the draining water, which could otherwise cause a significant indoor flood. It’s a tiny step that provides a lot of peace of mind before you open any valves. For more tips on getting your system ready for different seasons, consider these essential boiler maintenance steps to ensure it’s in top condition.
Getting On With The Radiator Drain Down
Right, with all the prep work sorted, it’s time for the main event. This is where your careful planning really pays off, turning what could be a messy job into a controlled, straightforward process. The trick is to be methodical and understand why you’re doing each step – it’s all about getting that old water out completely.
Your first move is to open the main drain-off valve you prepped earlier. Grab your adjustable spanner and turn it slowly, usually anti-clockwise. You’ll hear a trickle of water start, which will soon become a steady flow into the hosepipe leading outside. Don't panic if it seems a bit slow at first; that's perfectly normal, and we’re about to sort that.
What you're seeing now is just the water at the bottom of the system being pushed out by its own weight. The rest of the system is effectively a sealed container, holding onto the water with a vacuum. To get the rest out, we need to let some air in.
Breaking the Vacuum for a Fast, Full Drain
To get things moving and ensure you drain every last drop, you need to break that vacuum. You’ll do this by opening the bleed valves on your radiators, but there's a definite knack to the order you do it in. Always, always start with the radiator on the highest floor of your house – preferably the one furthest away from the drain-off valve. In a typical Eastbourne semi-detached, that's likely a bedroom or bathroom radiator.
Use your radiator key on that top-floor radiator and open the bleed valve. You'll hear a very distinct hissing sound as air rushes in to replace the water, which will now be gushing out of your hosepipe much, much faster. It's this simple action that allows the system to empty properly.
Once the gurgling from that first radiator stops and it seems empty, move on to the next one on the same floor. Then, just work your way down through the house, opening the bleed valve on every radiator. This top-to-bottom approach uses gravity to your advantage, helping every bit of water find its way to the drain-off point.
The simple process of shutting down the power, letting the system cool, and isolating the water supply is foundational to a safe drain-down. This visual guide summarises those critical first steps.
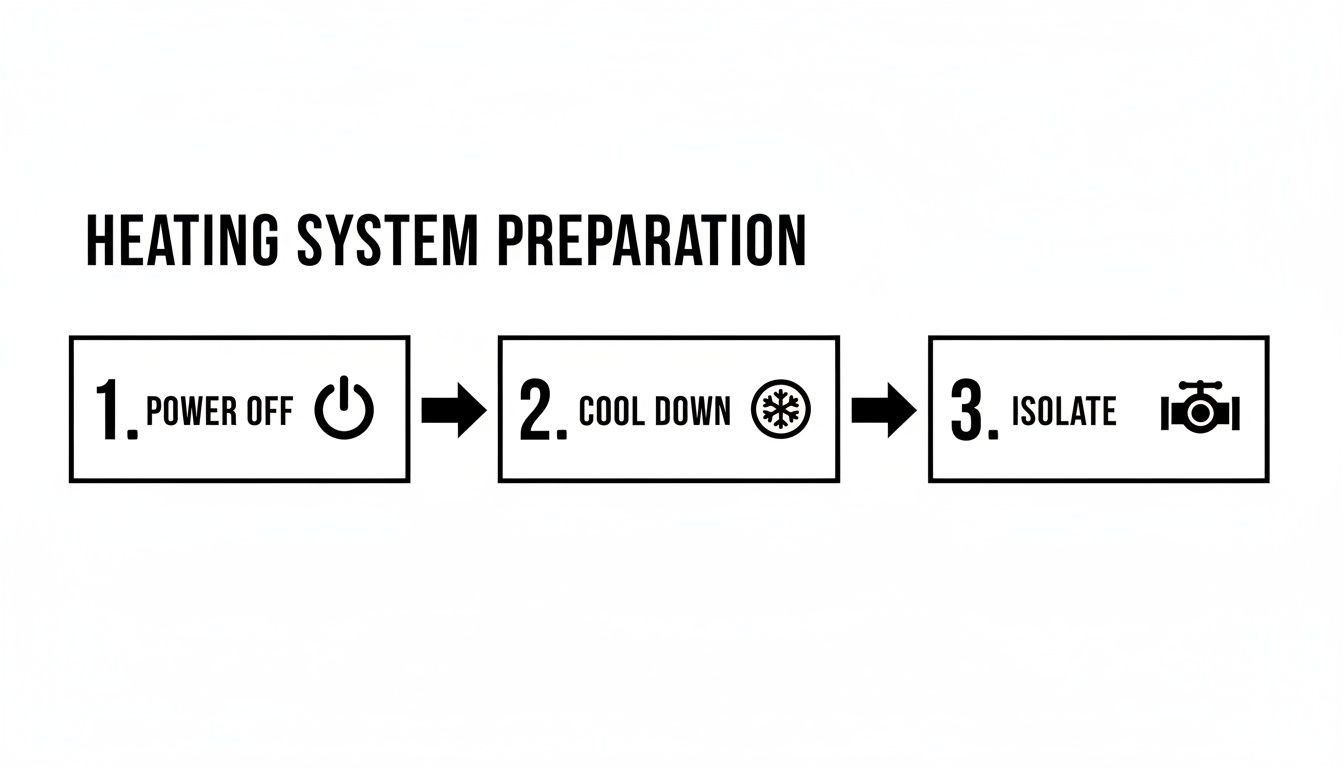
This sequence is non-negotiable. It removes any risk of scalding and stops the system from refilling itself while you work – an absolutely crucial foundation before you even think about touching a drain valve.
What’s the Draining Water Telling You?
As the water flows out, take a good look at its colour and what’s in it. This is basically a health report from the guts of your heating system.
Mostly Clear Water: Brilliant! If the water is running clear, your system is in good nick with very little internal corrosion.
Brown or Murky Water: This is a sign of rust and sediment. It's pretty common, especially in older systems, and confirms that a drain-down was a good move.
Thick, Black Sludge: If you see dark, sludgy water, that’s a red flag. This is magnetite sludge, a by-product of corrosion that absolutely kills your heating efficiency by creating cold spots at the bottom of your radiators.
If you’re faced with that thick, black sludge, a simple drain and refill won't cut it. While you'll get the water out, a lot of that heavy gunk will stay caked inside your radiators and pipes. You should seriously consider a professional power flush. If you want to dig deeper into this problem, we've put together a detailed guide on how to clean radiator sludge and restore your heating.
Tackling Stiff or Seized Valves
In the characterful older properties we see all over Eastbourne, it's common to find radiator valves that haven't been turned in a decade. If a bleed valve or drain cock refuses to budge, don't just put all your weight on it – you’re more likely to shear it off than open it.
Our Expert Tip from Harrlie Plumbing and Heating: Give the stubborn valve a quick spray with a penetrating oil like WD-40. Let it soak in for ten or fifteen minutes, then try again with gentle but firm pressure. Sometimes a little wiggle back and forth is all it takes to break the seal.
If a valve is well and truly seized, it's much safer to stop what you're doing and call in a professional. Here at Harrlie Plumbing and Heating, we have specialist tools to tackle seized components without damaging your pipework. Forcing it yourself could quickly turn a simple maintenance task into a much bigger, and more expensive, repair job.
Refilling the System and Bleeding Your Radiators
Getting the old water out is only half the job. Now for the crucial part: bringing your heating system back to life correctly. This ensures it runs efficiently and without any new, unwelcome gurgles or drips. The process varies a bit depending on your system, so let’s break it down.
Once the system is empty and you’ve done whatever you needed to do—whether that’s taking a radiator off for decorating or fitting a new one—the first job is to close everything back up. Make absolutely sure the main drain-off valve is tightly shut. Then, do a quick tour of the house and close every single bleed valve you opened earlier. It’s a simple check, but one that’s easily forgotten when you’re keen to get the heating back on.
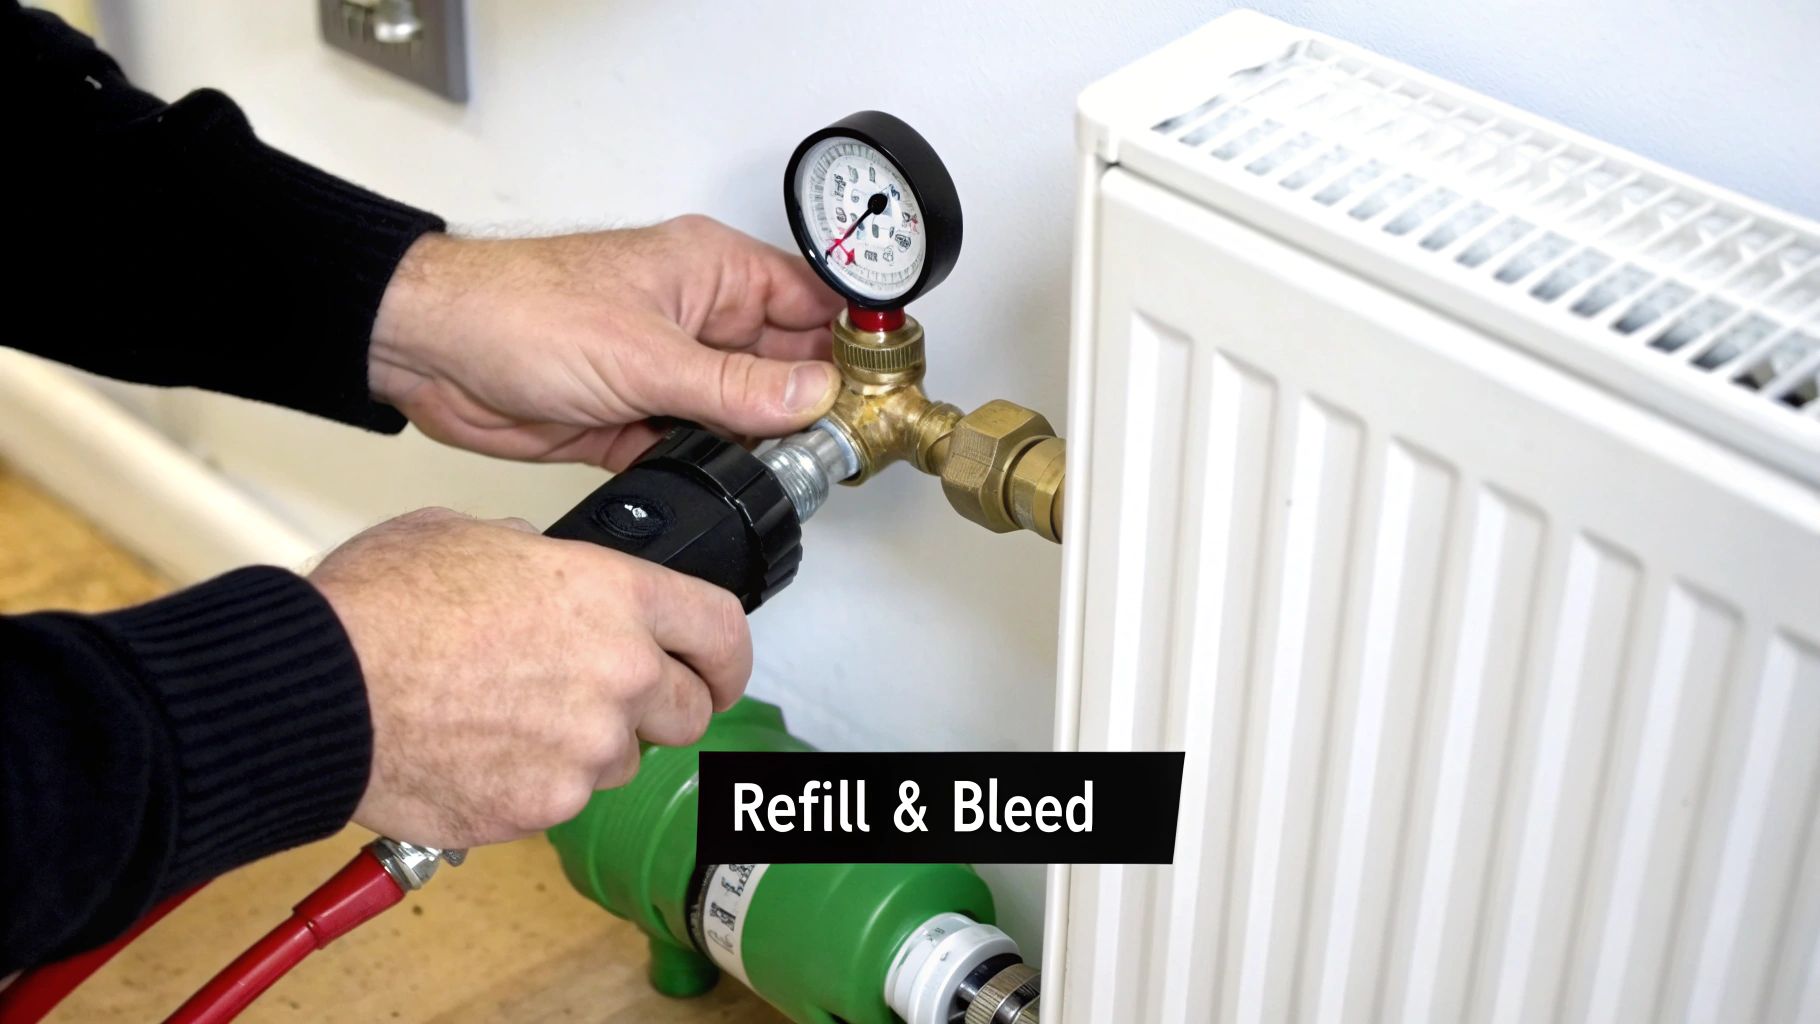
Repressurising a Sealed System
If you’ve got a modern combi or system boiler, you’re dealing with a sealed system. This means you need to manually reintroduce water using the filling loop. It’s usually a small, flexible, silver-braided hose tucked away under your boiler, with a little valve at each end.
Here’s the drill:
Attach the filling loop securely if it isn't already connected.
Slowly open one valve, then gently open the other. You'll immediately hear water rushing back into the pipes.
Keep a close eye on the pressure gauge on the front of your boiler. You’re aiming for a pressure of 1 to 1.5 bar while the system is cold.
Once you hit that sweet spot, close both valves on the filling loop, one after the other. It’s vital you then disconnect the loop to comply with water regulations.
Don’t be tempted to overshoot the pressure. If you do, no panic. Just head to the nearest radiator and bleed a little water out until the gauge needle drops back into the green zone.
Refilling an Open-Vented System
For those with an older, open-vented system—common in many of Eastbourne’s lovely character properties—the process is quite different. You won’t find a filling loop or a pressure gauge anywhere.
Instead, you’ll need to pop back up to your loft and reopen the valve you closed earlier on the small feed and expansion tank. This lets water from the mains start refilling the heating system automatically. You’ll hear it filling up, but be patient; it will take some time.
A Quick Note on Leaks: As water starts flowing back into the system, this is your prime opportunity to check for any drips. Walk around and inspect every radiator valve you touched, and don’t forget the main drain cock. Catching a small weep now will save you a world of hassle later on.
Don't Forget the Central Heating Inhibitor
Before you get too far along, you absolutely must add a central heating inhibitor. Think of this chemical as a bodyguard for the inside of your pipes and radiators. It’s a powerful liquid that prevents the formation of rust and that black, efficiency-killing sludge.
Adding it is straightforward. You can pour it directly into a radiator using a funnel, often through the bleed valve opening or by temporarily removing one of the top caps. Forgetting this step is a false economy; you’ll just be setting your system up for future problems and potentially expensive repairs. If you'd like to learn more, you can explore our expert guide on what central heating inhibitor is and why you need it.
The Final Step: Bleeding the Radiators
With the system refilled and pressurised, there’s one last job to do: getting rid of trapped air. Air is the enemy of an efficient radiator, causing those annoying gurgling noises and cold spots at the top.
This time, start bleeding from the ground-floor radiators and work your way up through the house. The logic is simple: air naturally rises, so you’re pushing it upwards and out.
Open the bleed valve with your radiator key.
You’ll hear the hiss of escaping air.
Keep a cloth handy to catch the dribble of water that will eventually follow.
As soon as a steady trickle of water appears, close the valve.
For sealed systems, you’ll need to keep an eye on your boiler’s pressure gauge. As you bleed air out, the pressure will drop. You'll likely need to top it up using the filling loop a couple of times during this process to keep it within that 1-1.5 bar range.
This kind of maintenance is vital. In a UK radiator market that’s growing at 3.5% CAGR, proper draining is essential for the 9% of demand driven by households. It helps prevent the 10% running cost increases caused by poor maintenance. When we at Harrlie Plumbing and Heating handle a refill in an Eastbourne home, we make sure the system pressure is perfect and the right dose of inhibitor is added. Professional work can deliver 10% higher efficiency and extend a system's life by up to 25% compared to DIY—crucial when older systems can lose 20% of their output to sludge.
Once every radiator has been bled and the pressure is stable, you’re ready to switch the heating back on. Sit back and enjoy a warm, quiet, and efficient system.
Troubleshooting Common Issues and When to Call an Expert
Even with the best preparation, a DIY radiator drain-down can sometimes throw a curveball your way. Don't panic. Most common issues are entirely fixable with a bit of patience and know-how, but it's just as important to recognise when a problem needs a professional touch.
This section is your troubleshooting field guide. We'll walk through the most frequent snags we see in Eastbourne homes and explain when it's time to put the tools down and give a certified expert, like our team at Harrlie Plumbing & Heating, a call.
Dealing with Stubborn Components
One of the most common frustrations is a valve that simply refuses to budge. Whether it's the main drain-off valve or a radiator bleed valve, years of disuse can seize them tight, especially in older properties with original fittings.
Before you apply brute force—which often leads to sheared metal and a much bigger headache—try a little persuasion. A quick spray of penetrating oil (like WD-40) can work wonders. Let it soak in for 15-20 minutes, then try again with firm, steady pressure. Sometimes gently rocking the valve back and forth is enough to break the seal.
If the valve still won't move or you feel the pipework flexing under the strain, stop immediately. This is the point where DIY can become destructive. A seized valve often needs specialist tools or even replacement, a straightforward job for a professional but a potential disaster if forced.
Pesky Drips and Leaks After Refilling
You've finished the job, refilled the system, and everything seems fine. Then you spot it: a slow, persistent drip from one of the radiator valves you worked on. It's a classic post-job headache.
First, check that the valve nuts are properly tightened. They should be firm, but over-tightening can damage the internal seals or the olive within a compression fitting. If it’s still dripping, you may need to re-wrap the threads of the valve tail (the part that screws into the radiator) with fresh PTFE tape.
However, if the leak is coming from the body of the valve itself or from the pipe connection and won't stop with gentle tightening, it's a sign of a failed seal or a damaged component. At Harrlie Plumbing & Heating, we've helped countless Eastbourne homeowners avoid water damage by stepping in at this exact moment to professionally replace a faulty valve.
Defining the DIY Boundary
Knowing your limits is the most important skill in any home maintenance project. While we want to empower you, safety and preventing costly damage must always come first.
Here are the clear signals that it's time to call in a certified plumber or Gas Safe engineer:
You Can't Repressurise the Boiler: If your filling loop isn't working or the pressure gauge won't climb back up to the recommended 1-1.5 bar, there could be an underlying fault with the boiler itself.
You Spot a Significant Leak: We're not talking about a small drip. If water is spraying or flowing steadily from a joint, pipe, or radiator, shut off your mains water stopcock immediately and call for an emergency plumber.
The System Won't Heat Up Correctly: After refilling and bleeding, if some radiators remain cold or the boiler is making strange noises ('kettling'), it could point to a severe sludge blockage, an airlock you can't shift, or a circulation pump issue.
You're Unsure About Your System Type: If you can't confidently identify whether your system is open-vented or sealed, or if you're unsure how to isolate it, it's safer to get professional guidance from a local expert like Harrlie Plumbing and Heating.
For a broader understanding of various household plumbing tasks and when to seek professional help, you can consult a comprehensive homeowner's guide to plumbing work. Ultimately, a simple drain-down should never risk the integrity of your entire heating system. When in doubt, a quick call can save you a world of stress and expense.
Got Questions About Draining Your Radiators?
Over the years, we’ve guided countless homeowners through this exact process, and we’ve heard just about every question under the sun. To help you feel confident before you start, we’ve pulled together the most common queries our Eastbourne clients ask us.
Think of this as a quick chat with one of our engineers from Harrlie Plumbing and Heating to clear up any last-minute doubts.
How Often Should I Drain My Central Heating System?
There’s no hard and fast rule, but a good rule of thumb is to drain your system every 5 to 6 years. That said, you should definitely do it sooner if your heating starts acting up.
Keep an eye out for these classic tell-tale signs:
Radiators are hot at the top but stubbornly cold at the bottom.
Your boiler has started making strange gurgling or banging noises (often called 'kettling').
The water looks very dark or even black when you bleed a radiator.
These are all symptoms of sludge building up inside the system. For landlords in the Eastbourne area, we often recommend a full system drain and flush between tenancies. It's a fantastic bit of preventative maintenance that can save you a world of hassle later on.
Do I Have to Drain the Whole System to Change One Radiator?
If you're tackling this as a DIY job, then yes—draining the entire system is by far the safest and cleanest way to do it. It completely removes the risk of any unexpected water flow and ensures there’s no pressure in the pipes while you work.
Now, a professional plumber from Harrlie Plumbing & Heating might use specialist pipe-freezing kits to create ice plugs, isolating just one radiator without a full drain-down. However, trying this without the right professional-grade gear can quickly lead to a serious flood. Plus, draining the system gives you the perfect chance to add a fresh dose of corrosion inhibitor, which is great for your entire heating network.
Key Takeaway: While the pros have their tricks, a full drain-down is the most reliable method for any homeowner. It’s thorough and removes any variables that could end in a watery mess.
What Is a Central Heating Inhibitor, and Is It Necessary?
A central heating inhibitor is a chemical liquid that stops internal corrosion, rust, and the build-up of that nasty black sludge inside your system. And yes, it is absolutely essential for the long-term health of your heating.
Without it, the various metals in your boiler, pipes, and radiators start reacting with the water and begin to break down. This process is what creates the sludge that causes blockages, poor performance, and eventually, expensive component failures. Every single time you refill your system after draining it, you must add a new dose of inhibitor. It’s a small, crucial investment to protect a very big one.
Why Did My Boiler Pressure Drop to Zero After Draining?
This is completely normal and exactly what you want to see happen! The pressure gauge on a sealed system (like you’d find with a combi or system boiler) is simply measuring the pressure of the water held inside the pipes and radiators.
When you drain all that water out, there's nothing left to create pressure, so the needle on your boiler’s gauge will naturally drop to zero. As you start refilling the system with the filling loop, you’ll watch that needle climb back up. The goal is to get it back into the manufacturer’s recommended range, which is typically between 1.0 and 1.5 bar when the heating is cold.
If you’ve followed the guide but are still running into trouble, or if you’d just rather leave it to a certified professional, the team at Harrlie Plumbing & Heating is always here to help. Serving Eastbourne and the surrounding areas, we can make sure your heating system is drained, flushed, and refilled properly for peak performance. Don't hesitate to reach out for a free, no-obligation quote by visiting https://www.harrlieplumbing.co.uk.

Comments