Fix a Radiator Cold at the Bottom in Your Home
- Luke Yeates
- Nov 10, 2025
- 14 min read

If your radiator is cold at the bottom but nice and warm at the top, the culprit is almost always a build-up of sludge. This thick, gritty gunk settles at the base, blocking hot water from circulating properly and leaving you with a radiator that’s only doing half its job.
Understanding Why Your Radiator Is Cold at the Bottom
When the heating clicks on, you expect every radiator to get to work, warming the room evenly. But if you run your hand along one and find it’s toasty at the top and stubbornly cold along the bottom, your heating system is waving a red flag. This isn't just a minor niggle; it's a sign of inefficiency that can drive up your energy bills and put unnecessary strain on your boiler.
Here in Eastbourne, we see this problem all the time at Harrlie Plumbing and Heating, in everything from modern flats in the Sovereign Harbour to older Victorian properties in Meads. The root cause is nearly always the same: poor water circulation due to an internal blockage.
The Main Culprit: Sludge Buildup
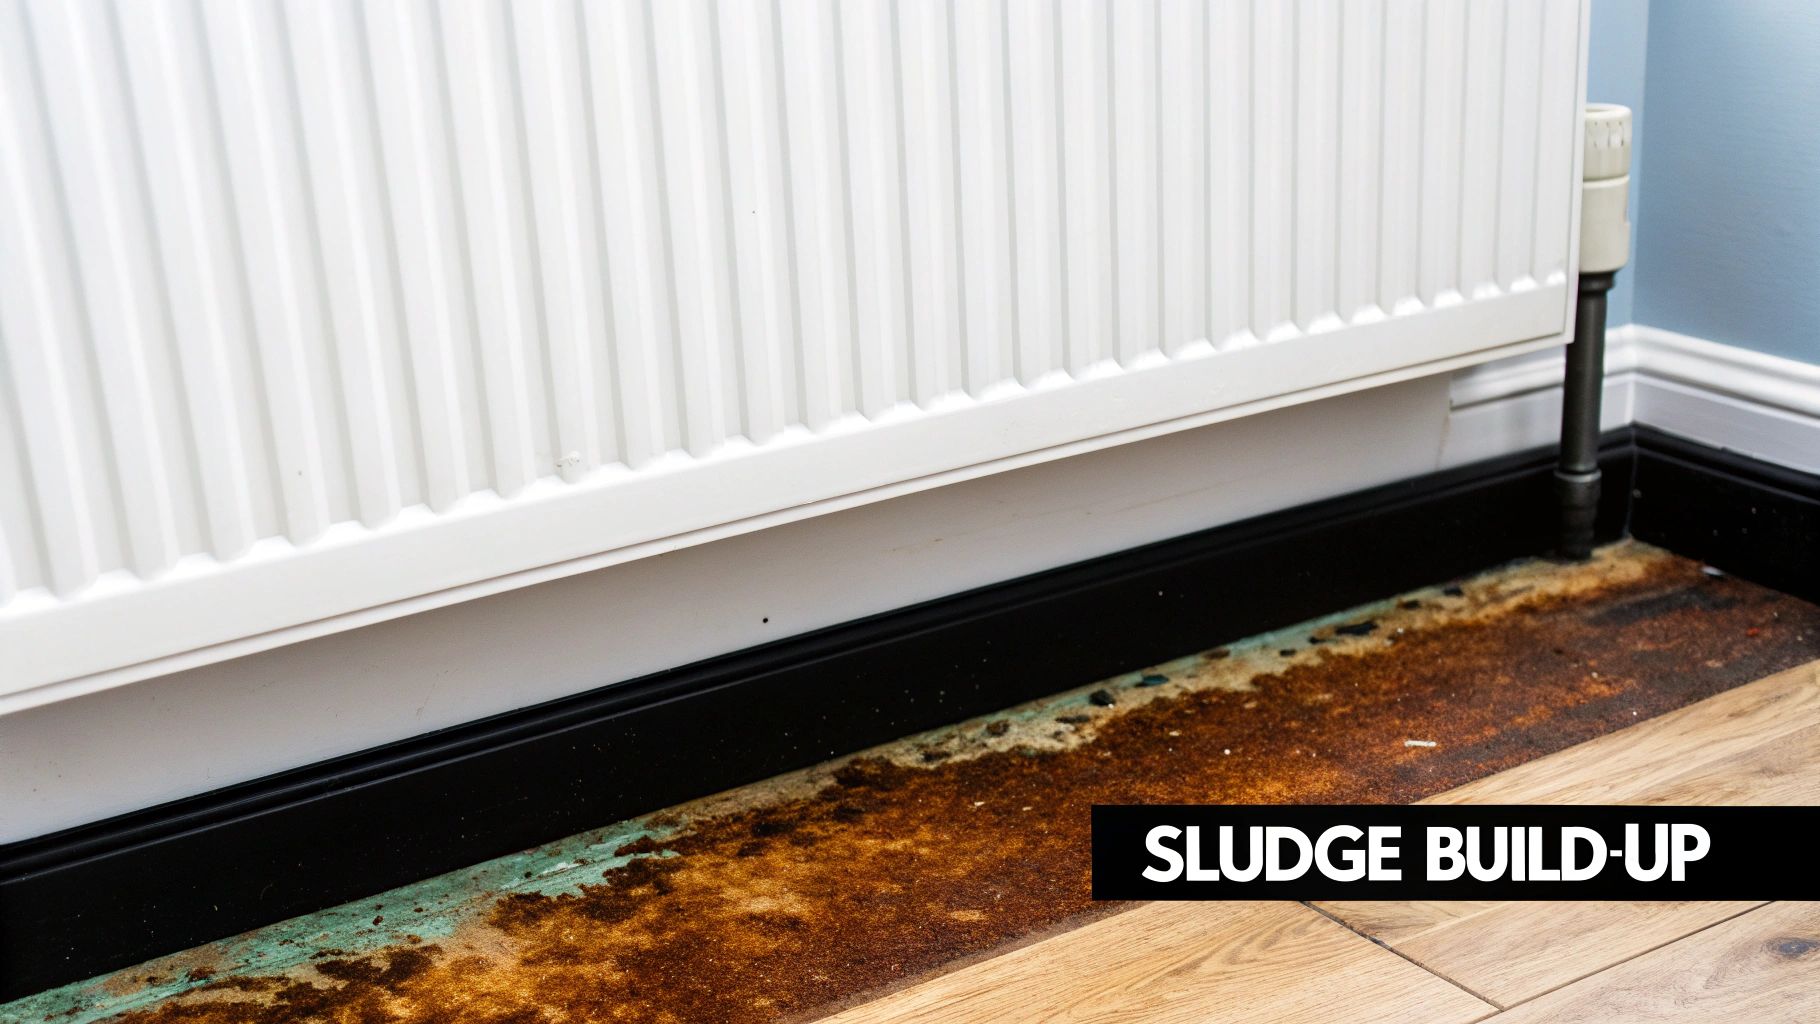
Over the years, the water inside your central heating system naturally causes the metal radiators and pipes to corrode. This process creates tiny particles of rust and other debris that mix with limescale and dirt, eventually forming a thick, dark substance we call heating sludge.
Because this sludge is heavier than water, gravity pulls it down to the lowest point it can find—which is, you guessed it, the bottom of your radiators. This accumulation acts like a dam, preventing hot water from flowing freely through the lower channels. The result? A hot top where water can still get through and a cold bottom where the flow is blocked.
If you're not sure whether you're dealing with sludge or another common issue like trapped air, our guide on fixing a radiator that isn't heating up properly can offer some more pointers.
You can quickly get an idea of what's going on by checking where the cold spots are. This handy table breaks down the most common symptoms.
Diagnosing Your Cold Radiator Symptoms
Use this table to identify the likely cause based on where your radiator is cold.
Symptom | Likely Cause | Primary Solution |
|---|---|---|
Cold at the bottom, hot at the top | Sludge Buildup | Chemical flush or power flush |
Cold at the top, warm at the bottom | Trapped Air | Bleeding the radiator |
Entire radiator is cold (but others are hot) | Stuck TRV pin or valve issue | Adjusting or replacing the valve |
Cold patches in the middle | Internal sludge deposits | Chemical flush or power flush |
As you can see, the location of the cold spot is a dead giveaway. If the problem is at the bottom, it's time to think about clearing out that sludge.
This quick decision tree helps visualise the two most common radiator cold spot problems and their primary solutions.
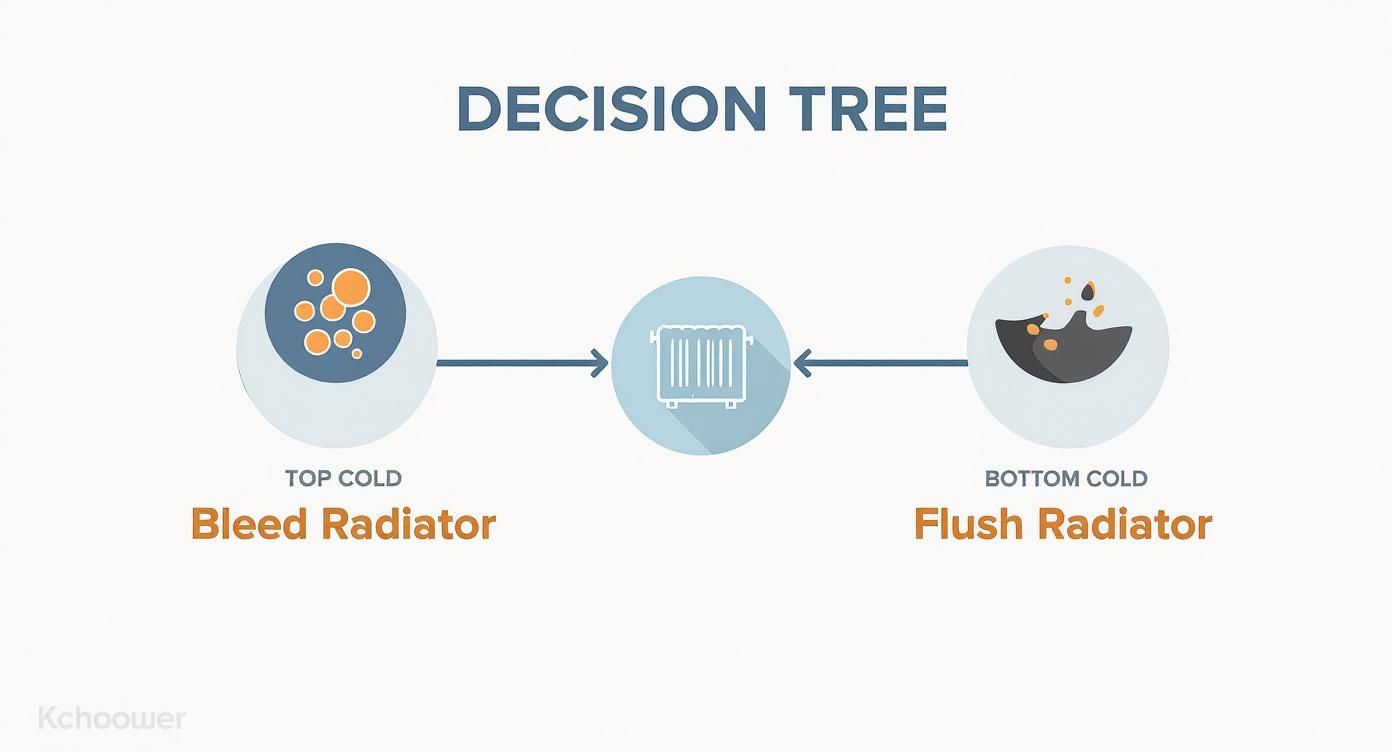
The infographic clearly shows that a cold bottom points towards sludge, requiring a flush, while a cold top indicates trapped air, which is fixed by bleeding.
Key Takeaway: A radiator that's cold at the bottom isn't a sign of a broken radiator itself, but rather an internal blockage that needs clearing. Ignoring it can reduce your radiator's efficiency by up to 30%.
The problem is incredibly common. Heating maintenance surveys often show that sludge-related issues are a leading cause of radiator inefficiency, with some suggesting that up to 40% of radiators in UK homes over 20 years old could benefit from a power flush to clear out these deposits.
Your First Stop: Bleeding Trapped Air
Before you jump to conclusions about sludge and system flushes, it’s always best to start with the simplest and most common radiator problem: trapped air. It’s true that trapped air usually makes the top of a radiator cold, but it can sometimes mess with the water circulation enough to cause some confusing symptoms. The good news is that bleeding your radiators is a quick DIY job every homeowner can and should feel confident doing.
We often get calls from homeowners from Polegate to Pevensey Bay, worried they have a major fault, only for our team at Harrlie Plumbing and Heating to find a bit of trapped air was the culprit. Releasing it can bring your radiator back to life in minutes, saving you a call-out fee.
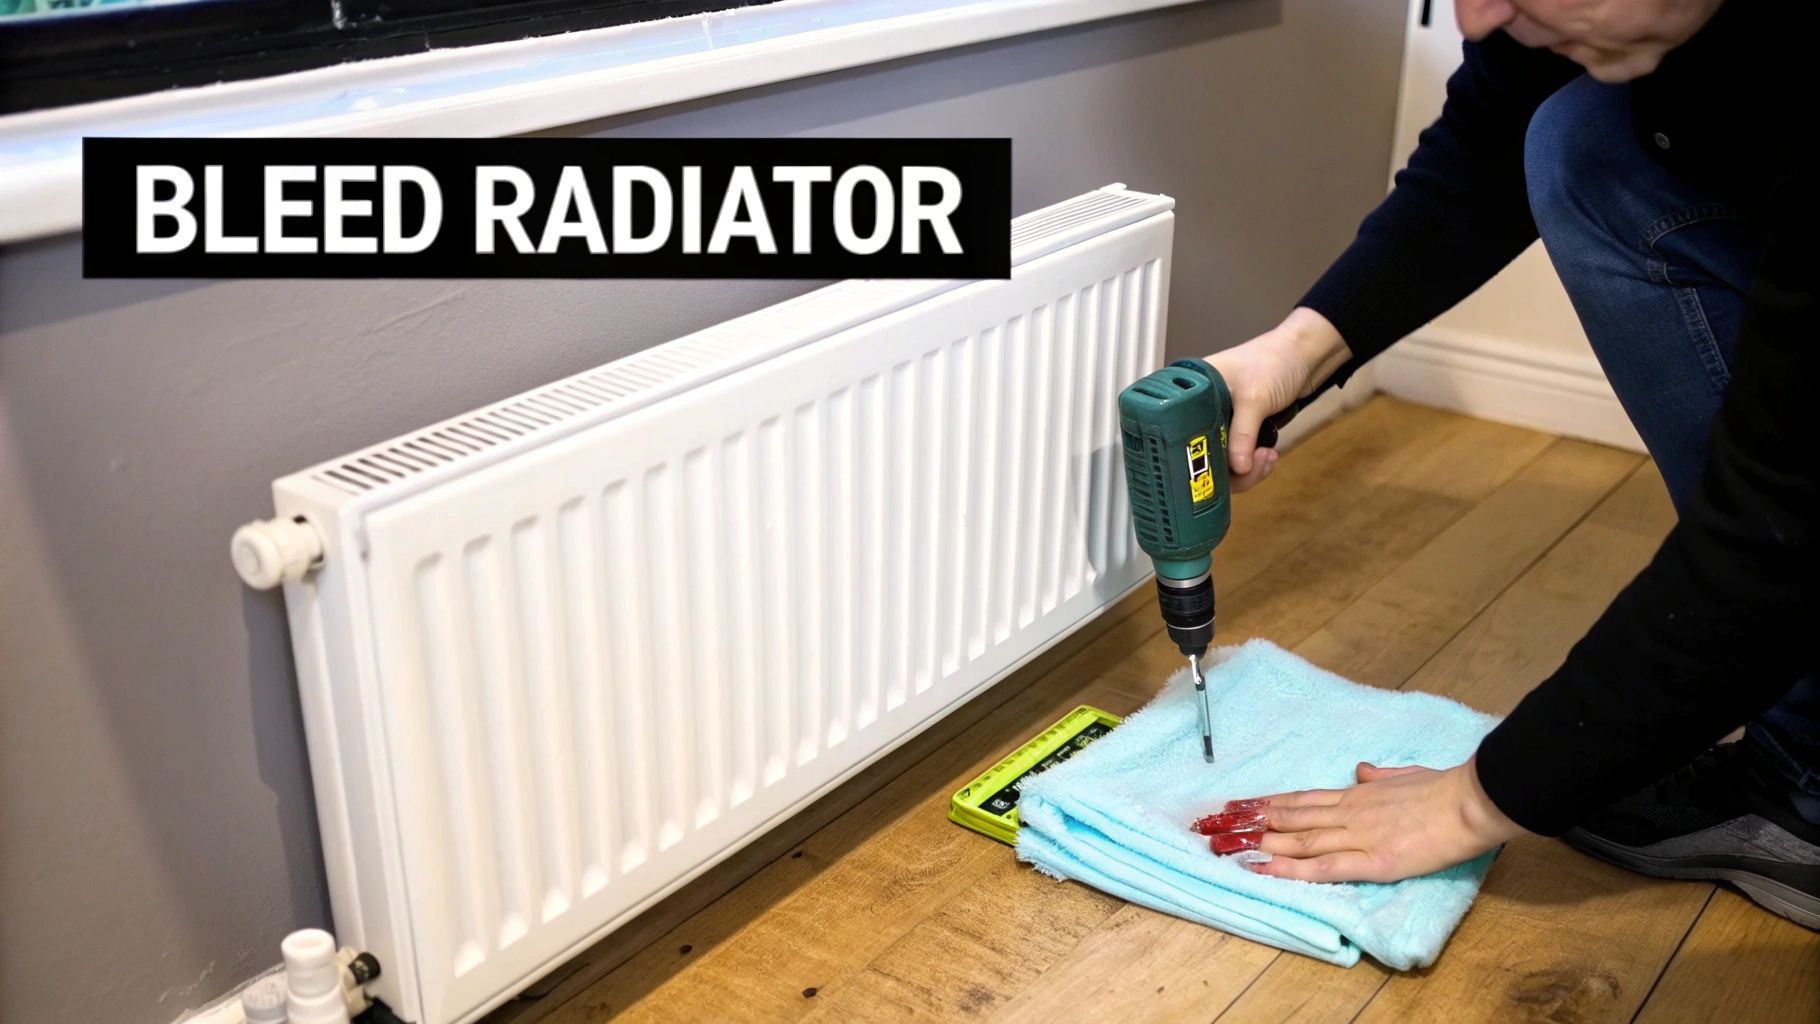
Getting Ready to Bleed Your Radiator
First things first, turn your central heating off completely. This is a crucial step that so many people miss. If the system is still running, the pump will be pushing water and air around, making it impossible to get all the air out properly. Just wait until all your radiators are cool to the touch before you start.
Next up, gather your simple toolkit:
A radiator bleed key: You can pick one of these up for pennies at any local hardware shop in Eastbourne.
An old cloth or rag: This is essential for catching drips and protecting your floors. A thick, absorbent microfibre cloth works a treat.
A small bowl or jug: A good idea to have on hand, just in case a bit more water comes out than you expect.
Pop the cloth and your bowl directly under the bleed valve. This is the little square or screw-headed valve you’ll find at the top corner of the radiator.
Releasing the Trapped Air
Right, now you’re ready to go. Fit the radiator key onto the bleed valve and give it an anti-clockwise turn—a quarter to a half turn is usually all it takes. You should immediately hear a distinct hissing sound. That’s the trapped air escaping, which is exactly what you want to hear.
Keep the key in place and let the air continue to hiss out. After a little while, the sound will stop, and a steady trickle of water will start to emerge instead. The very moment you see water, immediately turn the key clockwise to close the valve securely. Don't go overboard and overtighten it, just make it snug.
Harrlie's Pro Tip: Sometimes a bleed valve can be a bit stiff, especially on the radiators in older Eastbourne properties. We see this a lot in the beautiful Victorian houses in the town centre. If it won’t budge, you can use a pair of pliers to gently grip the key for a bit of extra leverage. Just be careful not to apply too much force and damage the valve itself.
Once you’re done, wipe away any drips. You can now turn your central heating back on. One last thing – remember to check your boiler’s pressure gauge. Releasing air can sometimes cause the system pressure to drop. If it’s below the recommended level (usually marked on the gauge, sitting around 1-1.5 bar), you’ll need to top it up.
Bleeding radiators is a straightforward task, but for a more detailed walkthrough with extra tips on common problems like stuck valves, you can check out our complete homeowner guide on how to bleed radiators. If after bleeding, the bottom of your radiator is still cold, then it’s almost certain you’re dealing with sludge.
Getting Rid of Sludge With a DIY Radiator Flush
So, you’ve bled the radiator, but the bottom is still stubbornly cold. If that’s the case, the culprit is almost certainly sludge. This nasty, gritty concoction of rust and limescale is the number one enemy of an efficient heating system, and it loves to settle at the bottom of radiators, blocking hot water from getting through.
Giving a single troublesome radiator a good flush yourself can be a fantastic way to clear it out and finally get some warmth back into the room.
This job means taking the radiator right off the wall and blasting it out with a hosepipe. While it’s definitely more hands-on than just bleeding it, it’s a task that many homeowners can tackle with a bit of confidence and the right preparation.
Gearing Up for Your Radiator Flush
Before you even think about touching a valve, make sure your central heating is switched off completely and every radiator is cold to the touch. You’ll also need a few bits and pieces for the job:
Two adjustable spanners: One to hold the valve in place and another to turn the connecting nut.
A radiator bleed key: You'll need this to let out any trapped pressure.
Old towels or dust sheets: Trust me, you'll want these. The water that comes out is black and sludgy, and it stains.
A large bucket or washing-up bowl: To catch the water as it drains.
Once you’ve got your tools ready, the first real step is to cut the radiator off from the rest of the heating system. You do this by shutting both the Thermostatic Radiator Valve (TRV) and the lockshield valve on the other side. Turn the TRV all the way to the ‘off’ or ‘0’ setting. For the lockshield, pop the plastic cap off and use a spanner to turn the valve clockwise as far as it will go.
Harrlie's Eastbourne Insight: Living in a coastal town like Eastbourne means the salty air can sometimes speed up corrosion, especially in older heating systems that aren't well protected. At Harrlie Plumbing and Heating, we often find that sludge buildup is much worse in homes closer to the seafront, making a proper flush all the more critical for keeping heating systems healthy.
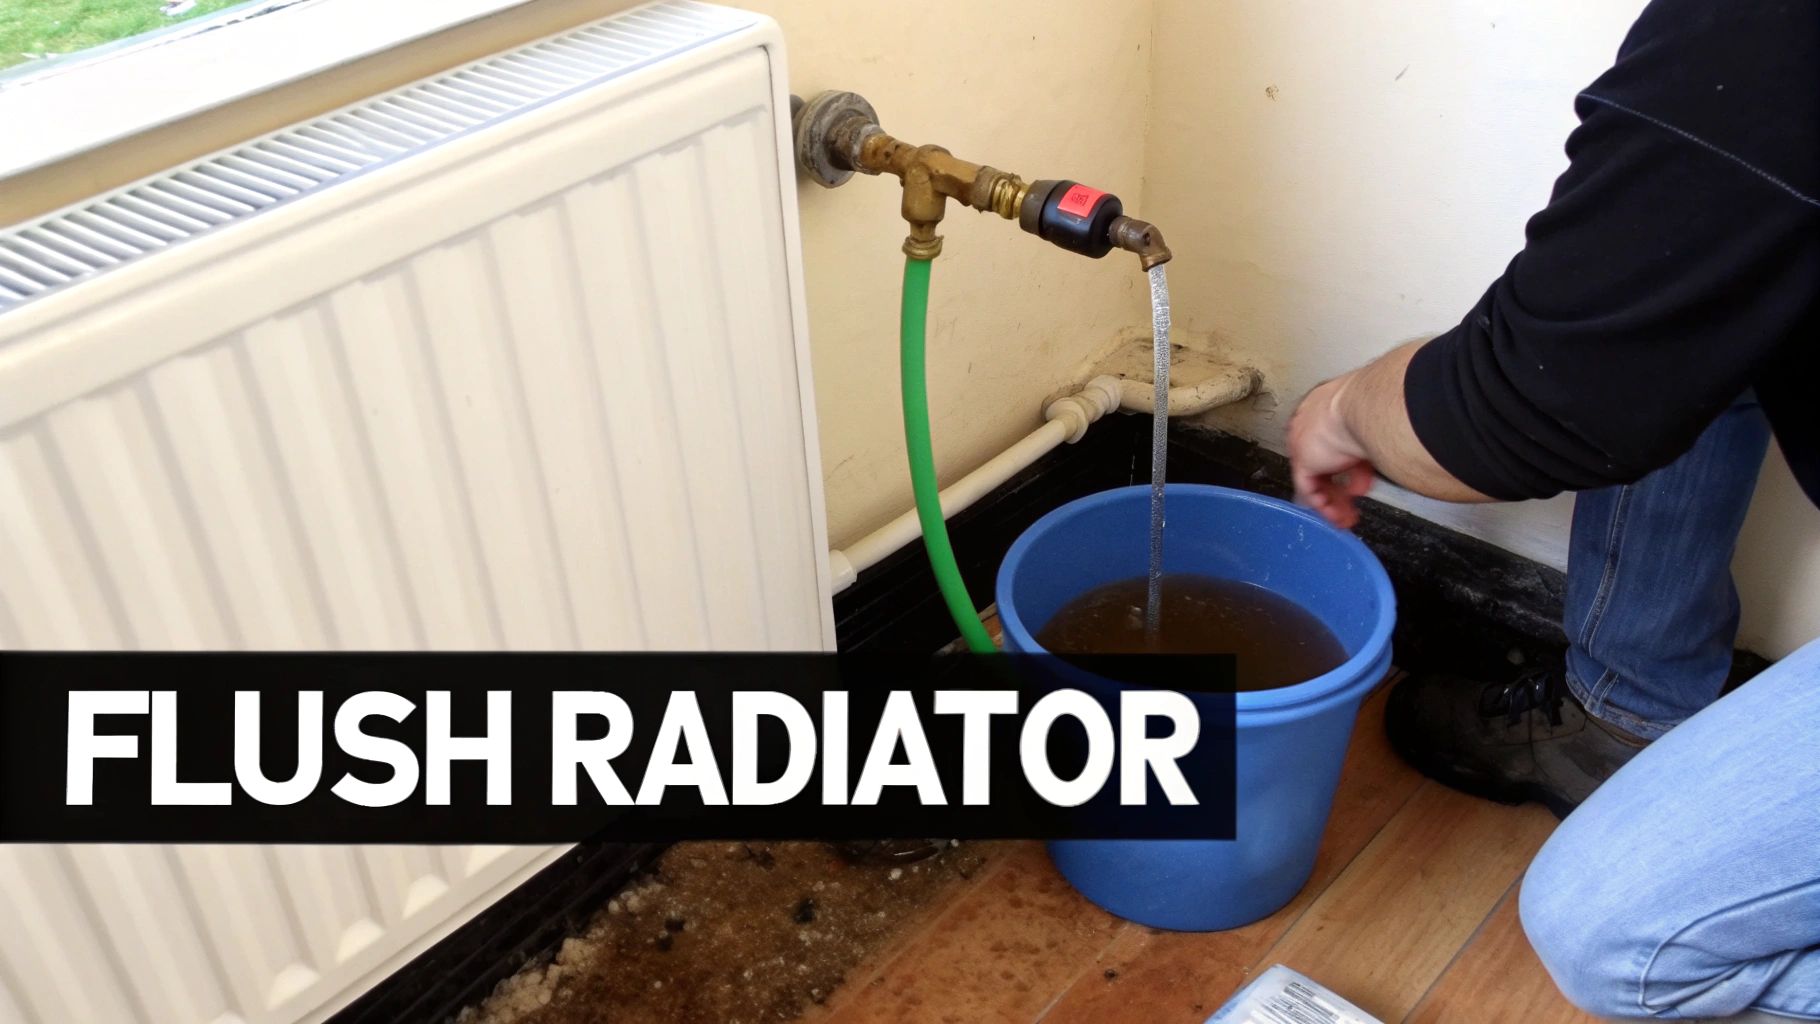
Draining and Flushing the Radiator
With both valves tightly closed, lay your towels down and slide the bowl under the TRV nut. Use one spanner to grip the body of the valve (to stop it twisting the pipework) and the other to gently loosen the big nut that connects the valve to the radiator itself. As you start to loosen it, water will begin to seep out.
Once the flow slows to a trickle, move over to the lockshield valve and do the exact same thing. Now you can fully undo both nuts. Gently lift the radiator up and off its wall brackets—be ready for it! It will still have some sludgy water inside and will be much heavier than you think. This is definitely a two-person job, so grab a friend to help you carry it outside.
Once you've got it outdoors, stick a hosepipe into one of the radiator's openings and turn it on full blast. You’ll probably be a bit shocked at the sheer amount of black, gritty gunk that pours out of the other end. Keep flushing it through until the water coming out runs completely clear.
When a DIY Flush Isn't Enough
Flushing a single radiator is a great fix for an isolated problem. But what if you’ve noticed that several of your radiators are cold at the bottom? That’s a massive red flag that the sludge problem isn’t just in one rad—it’s throughout your entire system.
In that scenario, cleaning one radiator won't solve the root cause. The sludge circulating in the pipework will just find its way back into your nice clean radiator before you know it. This is where you need to call in the professionals for a powerflush. Market trends show that 38% of UK homeowners now realise that older radiators are less energy-efficient, directly linking issues like cold spots to rising heating bills. A powerflush is the definitive fix for a system that's clogged with sludge.
When the problem is system-wide, it’s time to call in the experts. At Harrlie Plumbing and Heating, we use specialised powerflushing equipment to blast out debris from every single pipe and radiator. This professional service is like a factory reset for your heating system, ensuring every room in your Eastbourne home gets properly and efficiently heated again.
How to Balance Your System for Even Heat
So, you’ve bled and flushed a radiator, but it's still stubbornly cold at the bottom. What now? Before you get too frustrated, the problem might not be with that one radiator at all. It's often a sign that your whole system is out of whack.
Think of it like this: the hot water from your boiler is a bit lazy. It will always take the path of least resistance. This means the radiators closest to the boiler get all the good stuff, heating up nice and quick, while the poor radiator in your loft conversion or the back bedroom of your Eastbourne bungalow is left out in the cold.
Balancing your radiators is simply the process of tweaking the water flow to make sure every radiator gets its fair share. It’s a slightly more involved DIY job, but getting it right is a game-changer for consistent warmth throughout your home. It’ll even help lower your energy bills, which is something every Eastbourne household can get behind.
Getting to Grips with the Valves
To balance your system, you first need to know what you’re looking at. Most radiators have two valves:
The Thermostatic Radiator Valve (TRV): This is the one you probably twist every day. It has numbers on it and controls the temperature of the room. For balancing, you’ll need to turn this one all the way up to fully open.
The Lockshield Valve: This is the less-obvious one on the other side, usually hidden under a plastic cap. This valve is the key. It controls the flow rate of hot water passing through the radiator, and it’s the one we'll be adjusting.
The whole point is to gently restrict the flow to the radiators that get hot too quickly. This encourages the hot water to push on and find the radiators that have been struggling. It's a simple adjustment that ensures heat is distributed evenly across your home.
A Practical Method for Balancing
Right, let's get started. First, turn your heating off and let every radiator go completely cold. This is important for getting an accurate reading.
Once they're all cold, switch the heating back on. Now, grab a notepad and go on a tour of your house, checking which radiators heat up first. You're trying to figure out the pecking order. The first one to get warm is your "fastest," and the one that takes an age (or never gets warm) is your "slowest."
Got your list? Good. Turn the heating off again and let them all cool down.
Now for the adjustments. Head to your fastest radiator. Pop the cap off the lockshield valve and turn it fully clockwise until it's closed. From there, open it back up by just a quarter of a turn. For the next radiator on your list, do the same but open it a little more – maybe a half turn.
You see the pattern here? The further down your list you go, the more you open the valve. By the time you get to your slowest, coldest radiator, you’ll likely leave its lockshield valve fully open.
Harrlie’s Tip: This isn't a one-and-done job. After your first round of adjustments, turn the heating back on and see what happens. You'll probably need to do a bit more fine-tuning to get the balance just right. Patience is your best friend here, but the payoff is a perfectly cosy Eastbourne home.
A properly balanced system is fundamental to home energy efficiency. When you tackle issues like a radiator cold at the bottom, you’re directly improving your heating control. In fact, UK data shows that 50% of energy efficiency measures installed in homes are heating-related, and of those, heating controls make up a massive 97%. It just goes to show how vital system balance is for reducing waste. You can learn more about these heating efficiency findings and how they impact UK homes.
If you’ve tried balancing and you're still left with cold spots, it might be a sign of a deeper issue. Don't hesitate to give us a call at Harrlie Plumbing and Heating for an expert diagnosis.
When You Should Call an Eastbourne Heating Expert
Knowing your limits is a big part of successful home maintenance. While bleeding a radiator is a perfectly manageable DIY job for most, flushing one is a bit more involved. Sometimes, though, the problem isn't just one radiator acting up – it’s a symptom of a much wider issue.
Being able to spot the warning signs that point to a system-wide problem can save you a world of time, money, and cold-weather frustration. If you notice any of the following, it’s a good sign that your radiator cold at the bottom isn't a localised hiccup but a deeper issue that needs a professional eye.
Signs You Need a Professional
If you're nodding along to any of these, it’s probably time to put down the spanner and pick up the phone to a local expert like Harrlie Plumbing and Heating.
Multiple Radiators Are Cold: This is the big one. If it’s not just the living room radiator but a few others giving you grief, that’s a huge red flag. It strongly suggests that sludge isn't just in one spot; it's circulating throughout your entire system, and a single DIY flush just won’t cut it.
Thick, Black Water: When you bleed a radiator, take a good look at the water that comes out. Is it dark, thick, or gritty? That’s a clear sign of severe internal corrosion and a heavy concentration of sludge. Think of it as your heating system's cry for help.
Strange Noises From the Boiler: Are you hearing unusual banging, kettling (a sound like a boiling kettle), or gurgling sounds from your boiler? This can mean the pump is really struggling to push water through blocked pipes and sludgy radiators.
It’s worth remembering that the heating industry is always advancing. Initiatives like the UK's first low carbon heating apprenticeship mean that today's engineers are trained to handle both the latest eco-friendly systems and traditional setups with equal expertise.
The Power of a Professional Powerflush
A DIY flush usually involves running a garden hose through a single radiator. It’s a decent effort, but it’s nothing like what we do. A professional powerflush, which we carry out for homeowners all over Eastbourne, is a whole different beast.
We bring in a high-velocity pumping machine and connect it directly to your central heating system. This machine forces a powerful flow of water and cleaning chemicals through every single pipe, radiator, and component, scouring out the sludge and debris.
This deep cleanse removes years of accumulated gunk that a simple garden hose could never hope to shift. Afterwards, we add special corrosion-inhibiting chemicals to the system to protect it for the long term.
It’s not just about sludge, either. A certified Gas Safe engineer can diagnose other, more complex issues that might be causing your cold radiator. We’re talking about things like a failing circulation pump, a major blockage deep within your pipework, or even discovering that the pipes were installed incorrectly in the first place. These aren't problems you can spot on your own, but for our team at Harrlie Plumbing and Heating, it’s all in a day's work.
A Few Lingering Questions
Even after tackling the initial fixes, it's completely normal to have a few more questions pop up. Here are some quick, clear answers to the most common queries we get from homeowners across Eastbourne, designed to help you figure out what to do next with your heating.
How Often Should I Really Be Bleeding My Radiators?
As a good rule of thumb, it’s wise to bleed your radiators at least once a year. The best time to do this is in the autumn, right before you start firing up the central heating for the winter. Think of it as a simple but crucial task to add to your annual home maintenance list.
Of course, your heating system will give you clues when it needs attention sooner. If you hear any strange gurgling sounds coming from your pipes or notice those tell-tale cold spots creeping in at the top of a radiator, that's your cue to grab the bleed key. In a place like Eastbourne, where many of us live in charming older properties, staying on top of this little job can make a massive difference to your comfort and your bills.
For homeowners and landlords, knowing how to handle issues like a cold radiator is all part of the bigger picture of property upkeep. For a more complete view, you might find something like an ultimate rental property maintenance checklist useful for keeping the entire property in great shape.
I’ve Bled and Flushed It, but My Radiator Is Still Cold. What Now?
Right, so you’ve bled out all the trapped air and even given the individual radiator a flush, but it’s still stubbornly cold at the bottom. At this point, the problem is almost certainly buried deeper within the system. A DIY flush can only clear so much, and you’re most likely dealing with a stubborn sludge blockage that it just couldn't shift.
A couple of other culprits could be at play. You might have a failing pump in your boiler that no longer has the oomph to circulate the water properly, or there could be a major imbalance across your whole system that needs a professional touch to sort out. Honestly, this is where you call in an expert.
A Gas Safe registered engineer, like our team here at Harrlie Plumbing and Heating, has the specialist diagnostic tools to get to the root cause quickly. It might be a simple fix, or it could be a clear sign that a full system powerflush is needed to get things flowing freely again.
Is It a Bad Sign if Black Water Comes Out of My Radiator?
In a word, yes. Seeing black water when you bleed a radiator is a definite red flag. This dark, often gritty liquid is the sludge we've been talking about—it’s a nasty cocktail of rust, scale, and other metallic bits that have corroded away from the inside of your pipes and radiators over time.
While you might see slightly discoloured water in an older system, thick, inky-black water means there’s significant internal corrosion happening. This is the very stuff that causes blockages, creates cold spots, and forces your entire heating system to work much harder than it should. Any system showing this symptom will almost certainly benefit from a professional powerflush to boost its efficiency and, crucially, protect your boiler from damage down the line.
If you've tried the DIY route and your radiator is still giving you grief, don't just put up with a cold room. The expert team at Harrlie Plumbing and Heating is here to help homeowners across Eastbourne and the surrounding areas. Whether it’s a professional powerflush or a quick diagnosis you need, we’ll get your heating back to its best. Visit us at https://www.harrlieplumbing.co.uk to book your appointment.

Comments