A Homeowner's Guide to Repairing Water Pipes
- Luke Yeates
- Aug 6, 2025
- 16 min read

It starts with a tiny, almost unnoticeable drip, but a leaky pipe can quickly turn into a homeowner's worst nightmare. Repairing water pipes often escalates from a minor task to a major emergency in what feels like the blink of an eye. This guide is your first line of defence, designed to help you spot the problem, handle small fixes yourself, and know exactly when it’s time to call for backup.
The Unseen Problem of Leaky Pipes in Eastbourne
That faint dripping you hear behind a wall or the small, damp patch spreading across the ceiling is more than just an irritation—it’s a clear warning sign. These seemingly small issues are often just the tip of the iceberg, hinting at a much larger problem affecting countless homes.
Here in a coastal town like Eastbourne, the challenge is even greater. Many of our beautiful older properties, from charming Victorian terraces in the Old Town to seaside homes right on the front, still have their original copper pipework. After decades of service, these systems are up against a unique set of environmental pressures.
The salty sea air, for example, is notorious for accelerating corrosion. At the same time, the clay-rich ground we have across Sussex can shift subtly over time, putting immense stress on underground pipes. But it's not just older homes at risk. Even newer properties with modern plastic pipework can develop faults at joints and fittings, leading to leaks that cause significant water damage, mould growth, and eye-watering repair bills if ignored.
The Scale of Water Waste
This isn't just a problem for individual households; it's a nationwide issue. Our water infrastructure across England and Wales is under enormous strain. Between 2020/21 and 2022/23, leaky pipes were responsible for losing an average of 3 billion litres of water every single day. That's a staggering amount—enough to fill 1,200 Olympic-sized swimming pools daily. This national challenge has a direct impact on our local communities and resources. You can explore the full scale of this water loss and its cost to consumers in this detailed report.
To put that into perspective, a single slow drip from a faulty pipe fitting can waste over 100 litres of water in a day. Over a month, that's more water than a family of four would typically use for showering.
This is exactly why getting to grips with the basics of water pipe repair is so important. At Harrlie Plumbing and Heating, we see firsthand how quickly a small leak can spiral out of control. Our goal is to give Eastbourne homeowners the confidence to act decisively—whether that means tackling a simple DIY fix or calling us for professional help before the problem gets any worse. This guide will walk you through the entire process, from diagnosis to a lasting solution.
How to Diagnose Your Water Pipe Problem
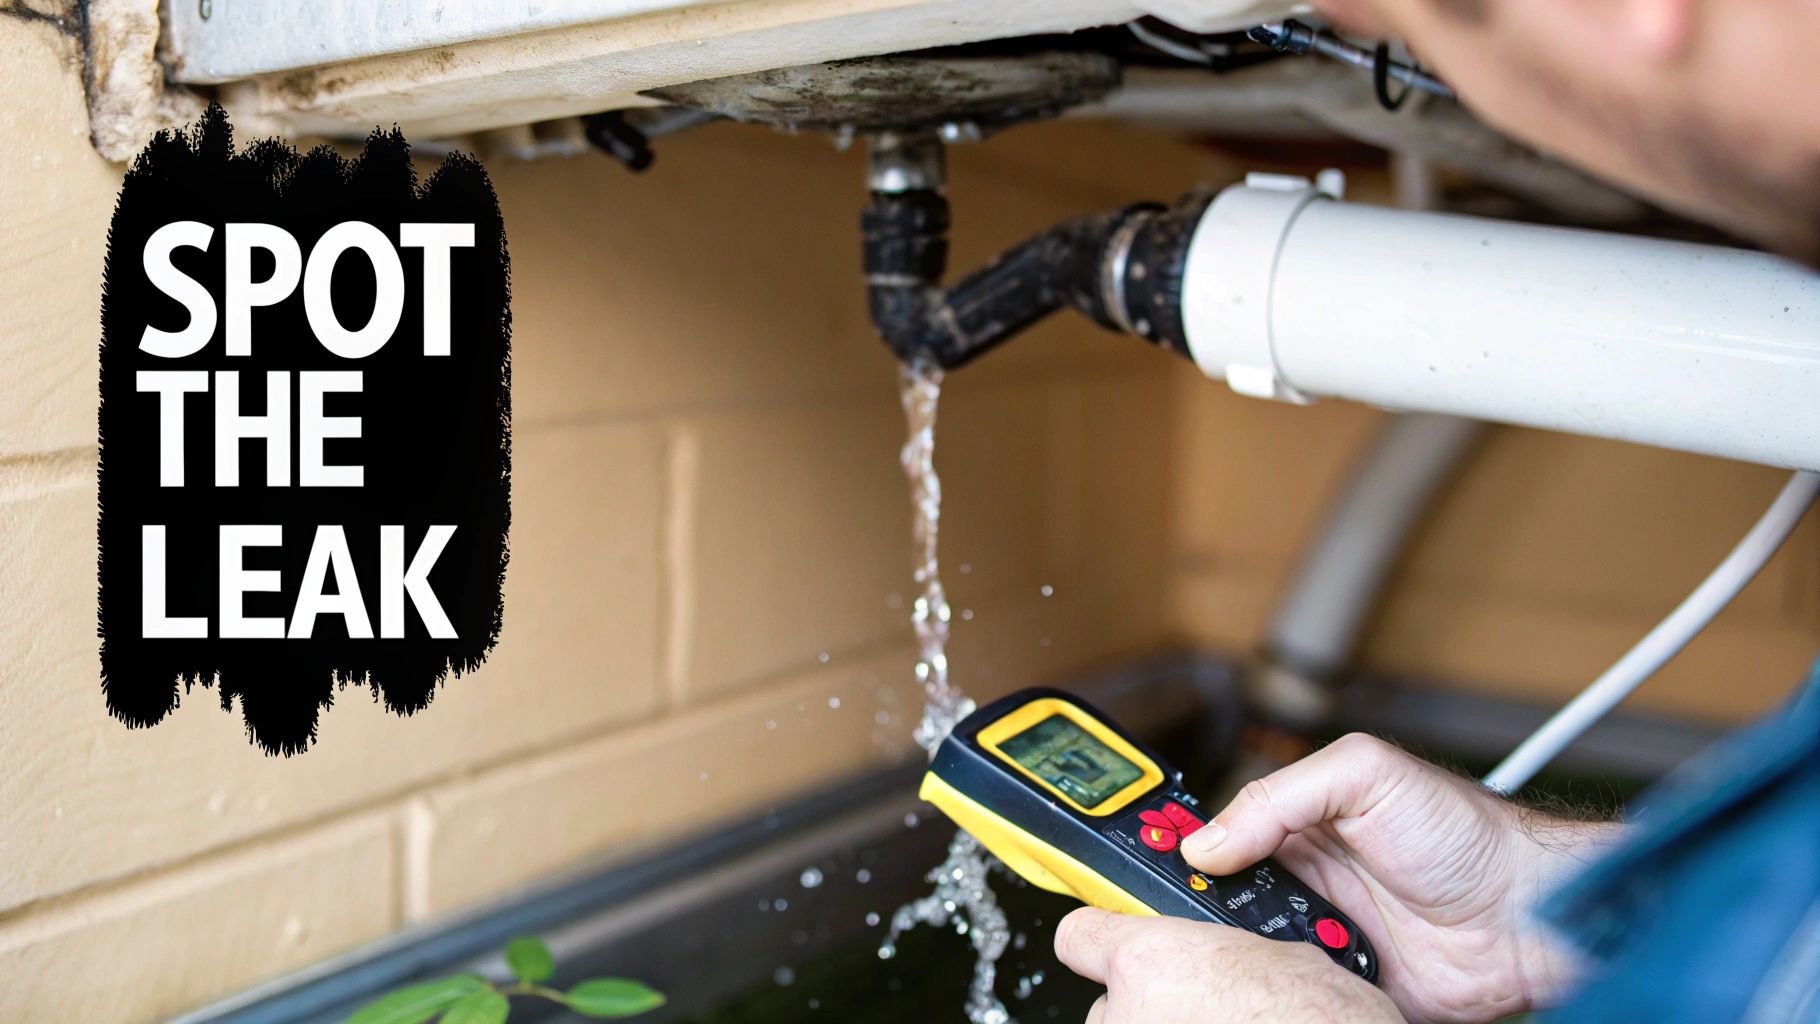
Before you even think about reaching for a wrench, you need to play detective. Finding the exact source of a water pipe problem is the most critical first step, and the clues aren't always as obvious as a puddle spreading across the floor. A good diagnosis will tell you whether you're looking at a minor DIY fix or a serious issue that needs a professional, fast.
Some signs are impossible to ignore, like a damp patch growing on your living room ceiling or the unmistakable sound of water spraying inside a kitchen cupboard. Others are far more subtle. An unexpected spike in your water bill or the faint, persistent sound of running water when all the taps are off are classic red flags that point to a hidden leak.
This diagnostic phase is all about gathering evidence before you start pulling up floorboards or cutting into walls. A calm, methodical approach will save you time, money, and a whole lot of stress.
Visual Clues and Common Culprits
Start with a thorough visual inspection. Grab a good torch and methodically check the areas where leaks are most common—under sinks, behind toilets, and around appliances. You're looking for more than just dripping water; the real signs are often less direct:
Discolouration or Stains: Yellow or brown marks on ceilings and walls are tell-tale signs of a slow, long-term leak from a pipe hidden above.
Warped or Damaged Materials: Keep an eye out for warped skirting boards, peeling paint or wallpaper, or flooring that feels strangely soft and spongy underfoot.
Mould or Mildew: That musty smell or the visible growth of mould, especially in corners or inside cupboards, is a sure sign of excess moisture.
Corrosion on Pipes: Take a close look at any visible pipework, particularly copper pipes. Green or white powdery deposits (verdigris) often form around tiny pinhole leaks or failing joints.
Here in Eastbourne, we see this all the time, especially in the lovely older Victorian and Edwardian properties around the town centre and Meads. After a century of service, the original copper pipework can become thin and develop pinhole leaks, particularly at joints and bends. Learning to spot these issues is vital, and you can find more details in our guide to [common plumbing issues in older Eastbourne properties and how to address them](https://www.harrlieplumbing.co.uk/post/common-plumbing-issues-in-older-eastbourne-properties-and-how-to-address-them).
The Water Meter Test: A Simple Way to Confirm a Leak
If you suspect a leak but can't see it, your water meter is your best friend. This simple test can confirm if water is escaping somewhere in your system, even if it's underground or buried deep within your home's structure.
Here’s how to do it:
Ensure All Water is Off: First, make absolutely certain that every tap, toilet, washing machine, and dishwasher in your home is turned off and not in use.
Locate Your Water Meter: It’s usually found outside your property in a small box under a cover on the pavement. Sometimes it might be inside, often under the kitchen sink.
Check the Dial: Look closely at the meter's dial. Most have a small wheel or triangle that spins whenever water is flowing. If everything inside the house is off but this little indicator is still moving, you almost certainly have a leak.
For a very slow leak, the dial might move almost imperceptibly. To catch it, take a reading or just snap a photo of the meter with your phone. Wait for an hour without using any water, then check it again. If the numbers have gone up, water is escaping somewhere.
Distinguishing Between a Drip and a Disaster
Once you’ve confirmed a leak, the next job is to figure out how severe it is. A slow drip from an exposed pipe under the sink is often a manageable issue you might tackle yourself. A major burst pipe gushing water, however, is a completely different beast that requires immediate action to prevent catastrophic damage.
Burst pipes are more common than many people realise. Recent statistics show the scale of the problem across the country; from 2023 to 2024, there were over 44,000 individual repairs carried out in England and Wales. That averages out to more than 100 bursts every single day, highlighting the constant pressure on our ageing water infrastructure.
If you’re faced with a significant leak or a burst pipe, don't hesitate. Your first priority is to turn off the main water supply at the stopcock immediately. If you're unsure how to proceed or the leak is in a place you can't reach, it’s time to call in the professionals. At Harrlie Plumbing and Heating, we handle these emergencies across Eastbourne daily and can help you get the situation under control fast.
Your Toolkit for Minor Water Pipe Repairs
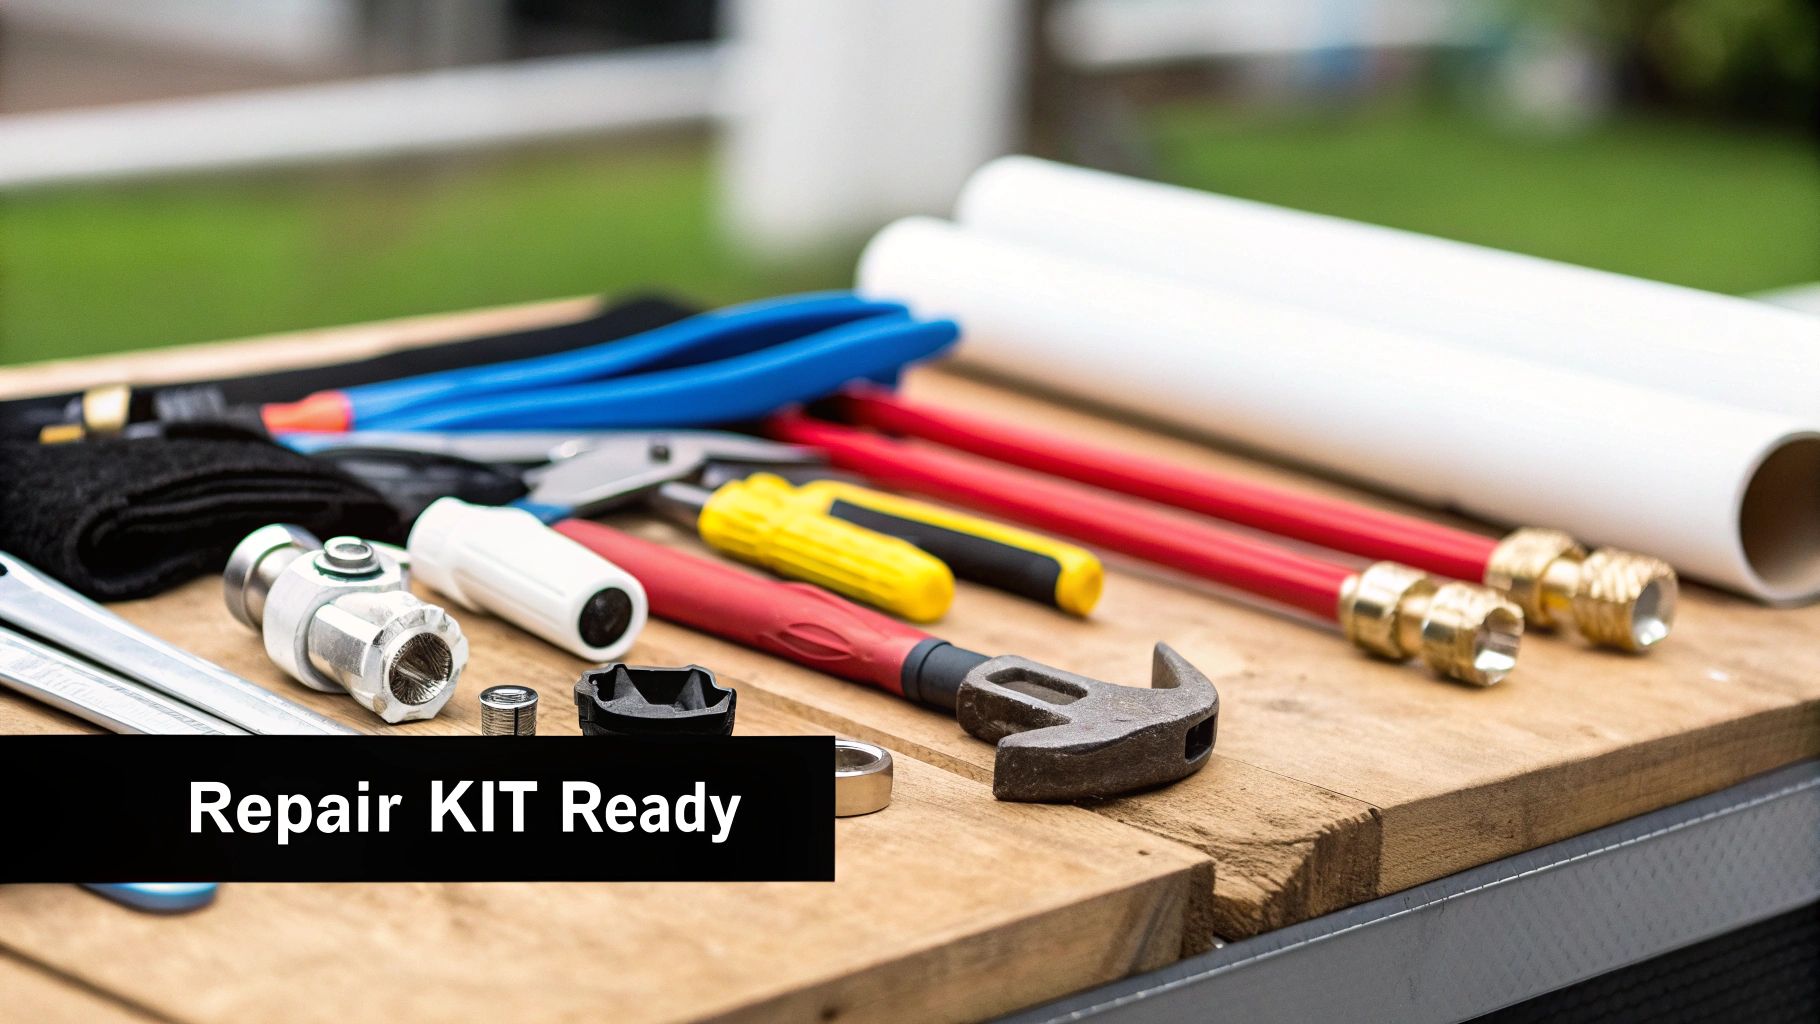
Walking into a large DIY store can feel a bit overwhelming, especially when you're faced with an entire aisle of plumbing parts. The key to turning a stressful emergency into a manageable project is having the right tools and materials on hand before you even start. This isn’t just a shopping list; it's your guide to putting together a capable toolkit for repairing water pipes with confidence.
Think of it like getting your ingredients ready before you start cooking. It means you can focus on the job without any frantic trips back to the shop. For anyone in Eastbourne, you'll find most of these essentials at local hardware shops in the town centre, or at the larger retailers like Wickes or B&Q just a short drive away.
At Harrlie Plumbing and Heating, we always turn up prepared, and we want you to feel that same readiness for those smaller DIY jobs.
Essential Tools for the Job
Before we get to the bits and pieces that will actually patch the leak, let's talk about the tools that do the heavy lifting. You don’t need a full professional setup, but a few key items are non-negotiable if you want a clean, secure fix.
Pipe Cutter: A proper pipe cutter is worlds better than a hacksaw. It gives you a clean, square cut without leaving behind little bits of metal or plastic (burrs) that can shred seals and cause problems down the line. For those tight spots under a sink, a compact, one-handed cutter is an absolute lifesaver.
Pipe Wrench or Adjustable Spanners: You’ll need two of these. One holds the pipe or fitting steady while the other tightens or loosens the nuts. Using two stops you from twisting and putting stress on the rest of your pipework.
Deburring Tool: This cheap and cheerful little tool cleans up the inside and outside of a cut pipe. It's a step many DIYers skip, but it’s crucial for getting a perfect seal, especially when you're using push-fit connectors.
And don't forget a bucket and some old towels. No matter how well you drain the system, there's always going to be some water left when you make that first cut.
Choosing Your Repair Materials
With your tools ready, it's time to pick the right materials to actually fix the leak. Your choice will usually come down to the type of pipe you have (copper or plastic) and the kind of leak you're dealing with.
A common point of confusion is whether to use PTFE tape or a jointing compound. PTFE tape is best for sealing threaded joints, like on a tap connector. A jointing compound, on the other hand, is better for compression fittings, as it provides a secondary seal around the little brass ring (the olive). Knowing which one to use is a small detail that makes a big difference.
While a burst pipe is a different beast entirely, the basic idea of creating a watertight seal is similar to other plumbing fixes. If you're looking to build your DIY skills, you might find our guide on [how to fix a leaking tap](https://www.harrlieplumbing.co.uk/post/how-to-fix-a-leaking-tap-an-eastbourne-diy-repair-guide) handy for getting the hang of these techniques.
To help you get started, here’s a quick table of the essential bits and pieces you might need.
Essential DIY Water Pipe Repair Toolkit
Item | Primary Use | Pro Tip |
|---|---|---|
Pipe Repair Clamp | A temporary, emergency fix for pinhole leaks. | Choose one with a thick rubber gasket. It's your first line of defence to stop the water while you get ready for a permanent repair. |
Push-Fit Connector | A permanent solution for joining two pieces of pipe. | These are brilliant for DIY. Just make sure your pipe ends are clean, cut square, and fully deburred before pushing the connector on firmly. |
Epoxy Putty | A mouldable substance for sealing small, non-pressurised leaks. | Knead it thoroughly until it's a uniform colour. It’s great for awkward spots but isn’t a long-term fix for high-pressure leaks. |
PTFE Tape | Sealing the threads on screw-in fittings. | Always wrap the tape in the same direction you'll tighten the fitting (usually clockwise). Three to four wraps are normally enough. |
Having a few of these items in your toolkit means you'll be well-prepared to tackle most minor leaks with confidence, turning a potential disaster into a satisfying fix.
Fixing a Minor Leak Like a Pro
Right, you’ve got your tools laid out, and it's time to get your hands dirty. We're moving from diagnosis to action now, getting stuck into the practical side of repairing water pipes. This is where we turn that moment of panic into a controlled, successful DIY project. Don't worry, we'll break it down into clear, achievable steps.
Let's put this into a real-world context. Imagine you’ve found a slow, weeping pinhole leak on a copper pipe under the sink in your Old Town flat in Eastbourne. The location is a bit awkward, but it's an exposed pipe—the perfect candidate for a confident DIY repair. This guide, packed with crucial safety warnings, will walk you through the fix correctly and safely the first time.
The First and Most Important Step: Shutting Off the Water
Before you even think about touching that pipe, you absolutely must stop the flow of water. Trying to fix a pressurised pipe will instantly turn a tiny drip into a powerful spray, causing a huge mess and immediate water damage. Finding and using your main stopcock isn't a suggestion; it's non-negotiable.
This critical first action has three key parts: locating the main valve, turning it off completely, and then draining the pressure left in the system.
To help you visualise this vital first action, here's a simple flow for safely shutting off your water supply.
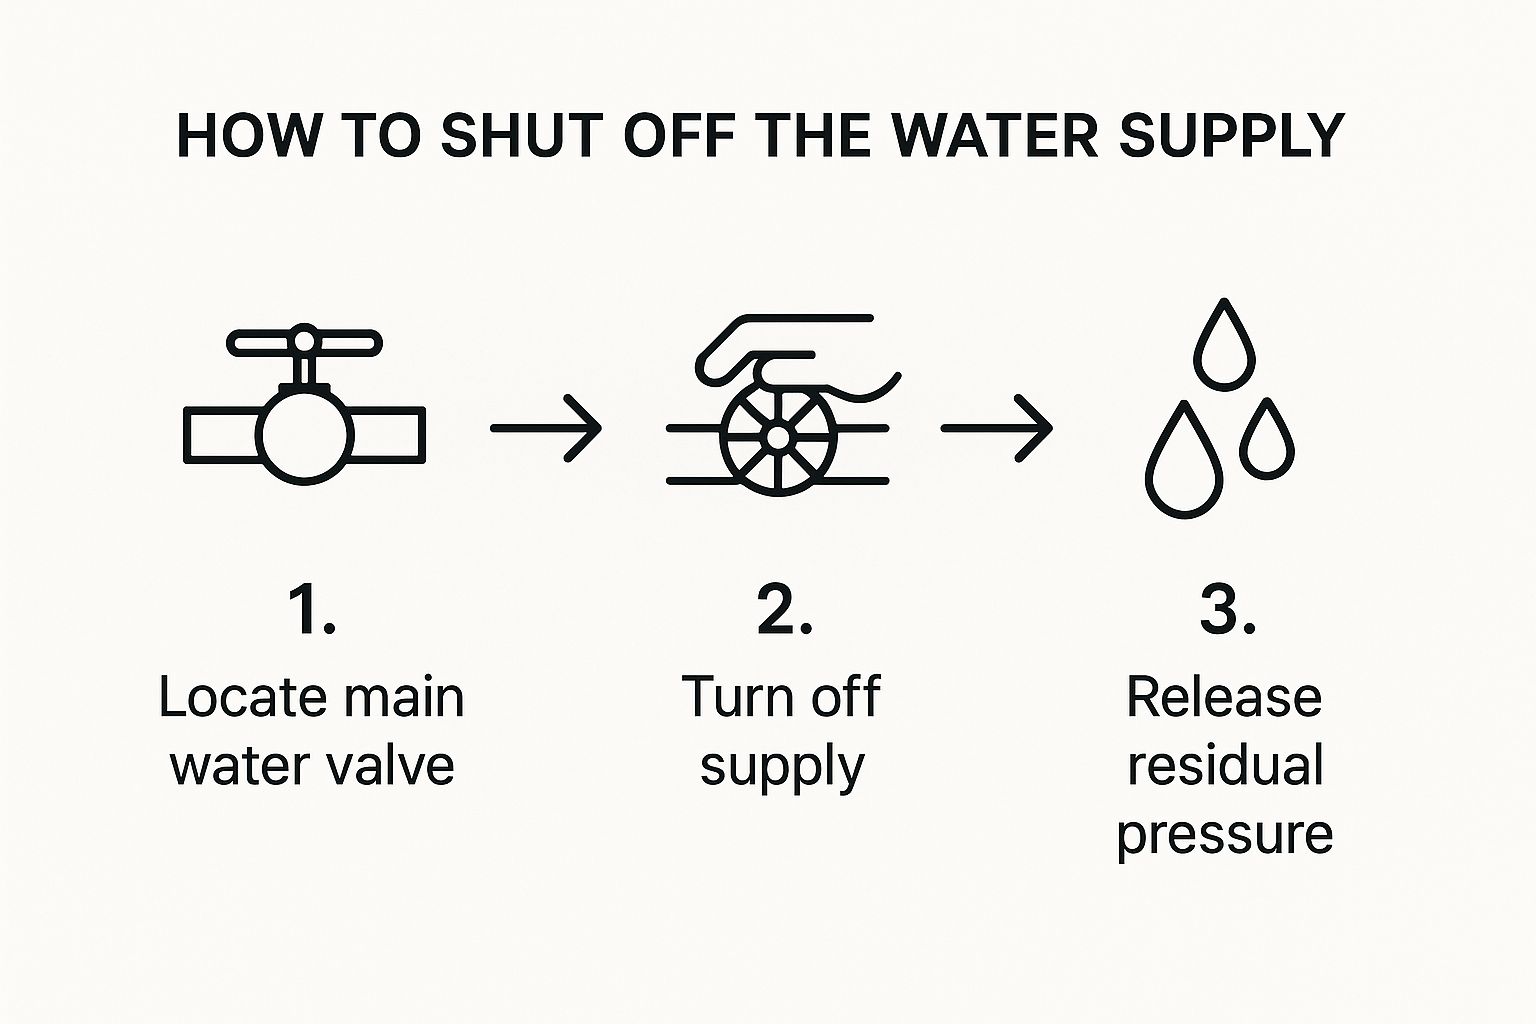
Following this sequence makes sure you can work on the pipes without any surprise gushes of water, making the whole job much safer and cleaner. Once the main supply is off, open the lowest tap in your house (like a garden tap) and the tap nearest to your repair to get the remaining water out of the pipes.
Preparing the Pipe for Repair
With the water off and the pipes drained, you can now get to work on the damaged section. The goal here is to remove the faulty piece of pipe and get the remaining ends ready for a new, secure connection.
Let’s jump back to our Eastbourne flat scenario. That weeping copper pipe under the sink needs a section cut out. Grab your pipe cutter—not a hacksaw, please—and position it on one side of the pinhole. Tighten it gently and rotate it around the pipe, tightening a little more with each turn until it cuts cleanly through. Do the same thing on the other side of the leak, leaving you with a gap and two fresh pipe ends.
This next step is one that many people skip, but it’s a detail that we at Harrlie Plumbing and Heating never miss. You must deburr the pipe ends. A freshly cut pipe has a sharp, raised edge. This tiny ridge is enough to tear the delicate rubber O-ring inside a push-fit connector, creating a brand-new leak right where you made your repair. Use a deburring tool or even a fine file to smooth both the inside and outside edges of the pipe.
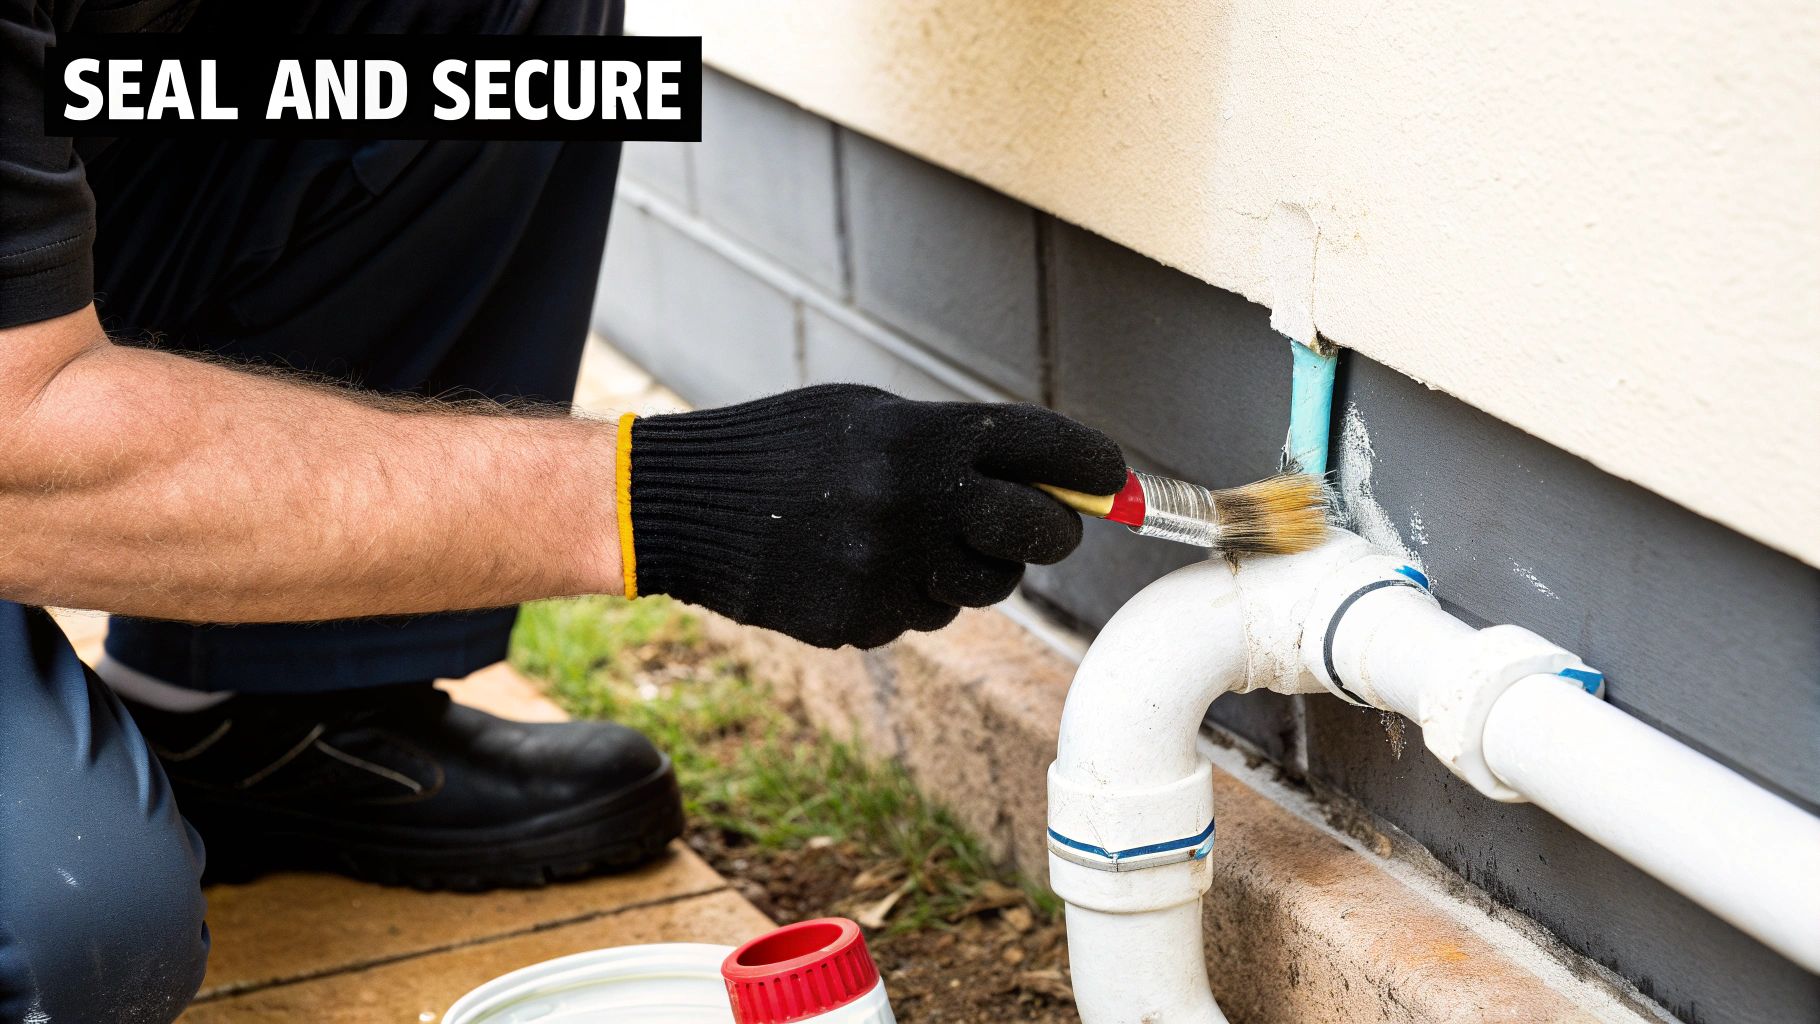
Fitting a Secure Replacement Connector
This is the moment of truth, where you create the new, watertight seal. For most DIY jobs on copper or plastic pipes, a push-fit connector is your best bet. It’s incredibly reliable and doesn't require any specialist tools like a blowtorch for soldering.
You'll need what's known as a 'slip coupling' or 'repair coupling'. Unlike a standard connector, this type can slide completely over one end of the pipe, which makes it easy to position in the gap you’ve just created.
Here’s the process for installing it:
Check for Pipe Inserts: If you're working on a plastic pipe, you must use a pipe stiffener or insert. Push one into each open end of the pipe. This small plastic or metal piece stops the pipe from collapsing under pressure and is absolutely vital for a secure seal. Copper pipes don't need them.
Mark the Insertion Depth: Push-fit connectors need the pipe to be inserted to a specific depth to seal properly. Most good quality fittings come with a depth gauge, or you can check the manufacturer’s instructions. Use a pen to mark this depth on both pipe ends.
Position the Coupling: Slide the slip coupling fully onto one end of the pipe. Now, line up the other pipe end and slide the coupling back across the gap until it meets the depth mark on the second pipe. You should feel a distinct 'click' or 'thud' as the pipe seats correctly inside the fitting's grab ring.
Lock it in Place: Give both ends of the pipe a firm tug. The connector should hold fast. If it pulls off, it means the pipe wasn't inserted all the way or wasn't deburred correctly.
This method creates a permanent, professional-grade seal that should last for years to come.
The Final Check: Turning the Water Back On
You've done the hard work, but the job isn't over until you’ve tested it. You need to do this carefully to avoid a pressure shock to your system, which could loosen other old joints somewhere else in your home.
Start by closing all the taps you opened earlier. Then, head back to your main stopcock and turn it on slowly—just a quarter turn at first. You should hear the water start to fill the pipes. Listen very carefully for any hissing or dripping sounds.
Once you’re happy there are no immediate problems, open the stopcock fully. Now, go back to your repair. Inspect the new fitting from every angle. Take a dry piece of kitchen roll and wipe it all around the joints. If it comes away bone dry, congratulations! You've successfully fixed the leak.
If you do spot a tiny bead of water, don't panic. Turn the water off again. The most likely culprit is that the pipe wasn't pushed in far enough. Most push-fit connectors can be taken off with a special release tool, letting you try again without having to cut the pipe. However, if you’re unsure or the leak just won't stop, it’s always best to call in a professional. A quick call to us at Harrlie Plumbing and Heating can provide that final bit of expert help to ensure your Eastbourne home is secure and leak-free.
When to Call a Professional Plumber
While sorting out a minor leak yourself can feel incredibly satisfying, the most important skill in any DIYer’s toolkit is knowing your limits. When it comes to repairing water pipes, a small misjudgement can escalate into a full-blown flood, racking up thousands of pounds in damage.
Knowing the red flags that scream "call a professional" is absolutely crucial for protecting your home.
There are certain situations that are simply not cut out for a DIY approach, no matter how confident you might feel. These are the non-negotiable moments where you should pick up the phone and call a trusted local team like Harrlie Plumbing and Heating. These scenarios demand specialised equipment, years of experience, and a deep understanding of complex plumbing systems that goes far beyond a simple patch-up.
Trying to tackle these jobs yourself can lead to serious structural damage, eye-watering repair bills, and might even invalidate your home insurance. It's just not worth the risk.
Hidden Leaks Inside Walls and Floors
One of the trickiest plumbing problems is the one you can’t actually see. If you’ve spotted damp patches creeping across your walls, soft spots on the floorboards, or a persistent musty smell with no obvious source, you’re likely dealing with a hidden leak.
Here in Eastbourne, many properties have solid concrete floors or traditional lath and plaster walls. Trying to find a leak in these materials without the right gear is a recipe for disaster. You could end up causing widespread damage just looking for the problem.
We use advanced tools like acoustic listeners and thermal imaging cameras to pinpoint the exact location of a hidden leak with surgical precision. This minimises disruption and damage to your home, saving you from the mess and expense of unnecessary demolition work.
Issues with the Main Water Supply
Any problem related to the main water supply pipe—the one running from the street into your property—is strictly a job for the pros. These pipes are under constant high pressure, and a botched repair can cause a major incident that affects not just your home, but your neighbours' as well.
These repairs often involve digging near other utilities, which requires specific qualifications and permits. At Harrlie Plumbing and Heating, we have the expertise and insurance to handle these critical jobs safely and in line with all local regulations.
Major Pipe Bursts and Flooding
A burst pipe is a true emergency. When water is gushing into your home, your only priorities should be shutting off the main water supply and calling for help. The sheer volume of water makes a DIY fix both impossible and dangerous.
A professional plumber can not only stop the flood but also figure out what caused it—whether it was freezing temperatures, corrosion, or excessive pressure—to make sure it doesn’t happen again.
The Advantage of Professional Technology
Modern plumbing isn't just about wrenches and elbow grease anymore. Today's technology makes professional repairs faster, less disruptive, and more reliable than ever. One of the biggest developments is trenchless repair technology. For issues with underground pipes, like those running under a driveway or a beloved garden in an Eastbourne home, this is a total game-changer.
Recent advances in these methods are transforming water pipe maintenance, with some techniques cutting repair times by up to 90% and reducing costs by around 88%.
Choosing the right expert is just as important as deciding to call one in the first place. To make sure you’re getting a reliable and qualified professional, have a look at our essential tips for [finding the right plumber or heating engineer in Eastbourne](https://www.harrlieplumbing.co.uk/post/essential-tips-for-finding-the-right-plumber-or-heating-engineer-in-eastbourne). It's about more than just getting the job done; it’s about the peace of mind that comes from knowing it’s done right.
Still Have Questions About Repairing Water Pipes?
Even with a good guide in hand, you might still be mulling over a few things. That’s perfectly normal. Here, we tackle some of the most common questions we hear from homeowners across the Eastbourne area about repairing water pipes.
How Much Does Professional Pipe Repair Cost in Eastbourne?
This is a big one, and the honest answer is: it really depends on the leak’s location and how tricky it is to get to. Fixing a simple, exposed pipe under your kitchen sink will, of course, cost less than finding and repairing a leak buried deep inside a solid wall or beneath a concrete floor.
At Harrlie Plumbing and Heating, we believe in being completely upfront. We’ll always take a good look at the problem first and give you a clear, itemised quote before we pick up a single tool. That way, you know exactly where you stand, with no nasty surprises on the final bill.
Can I Claim Pipe Repairs on My Home Insurance?
We get asked this a lot. The answer usually comes down to the fine print of your policy. Most UK home insurance policies will cover the cost of finding the leak – a process they call 'trace and access' – along with the damage caused by the water that escaped.
However, the actual repair to the pipe itself is often seen as general wear and tear, which might not be covered. The best thing to do is to check your policy documents or give your provider a call. We can supply detailed invoices that make the whole claims process much smoother for you.
What’s the Difference Between Push-Fit and Compression Fittings?
When you’re staring at the options in a DIY shop, you’ll mainly see these two types. Push-fit connectors are a DIYer’s best friend because you barely need any tools. You just push them firmly onto a clean, smooth pipe end to create a solid, watertight seal. Simple as that.
Compression fittings, on the other hand, use a threaded nut to squeeze a small brass ring (called an 'olive') onto the pipe. This method needs two spanners—one to hold the fitting still and another to tighten the nut—to create the seal. While both work well, push-fit connectors are usually the quicker, more foolproof choice for a reliable fix.
For many homeowners tackling their first repair, the simplicity of a push-fit fitting is a game-changer. It removes the guesswork of how much to tighten a nut and provides a reliable seal with just a firm push, making it an excellent choice for repairs in tight or awkward spaces.
The Whole Street Has No Water – Is It My Pipe?
If you wake up to dry taps and find out your neighbours are in the same situation, the problem almost certainly isn't in your home. A widespread outage like that points to an issue with the local water main that supplies your entire area.
Before you call a plumber, your first move should be to check the website of your local water supplier. For anyone in the Eastbourne area, this is [Southern Water](https://www.southernwater.co.uk/). They’ll have a live incident map or a service update page showing any reported problems or emergency work happening in your postcode.
If you're dealing with a leak that just won't quit or a plumbing emergency that feels a bit out of your depth, don't hesitate. For trusted, professional help in Eastbourne and the surrounding areas, contact Harrlie Plumbing and Heating. We're here to provide fast, reliable solutions and peace of mind. Get your free quote today.

Comments