Shower Leaks Through Ceiling? Find Out How to Fix It Today
- Luke Yeates
- Oct 14, 2025
- 13 min read

Spotting a shower leaking through the ceiling is a heart-stopping moment for any homeowner. That discoloured, damp patch isn't just a cosmetic issue—it's a serious warning sign that water is escaping somewhere it absolutely shouldn't be. This isn't just about a bit of paintwork; it's a direct threat to your home's structural integrity and a potential breeding ground for hidden mould. Acting fast is crucial to stop a small problem from spiralling into a massive, expensive repair job.
What That Ceiling Stain is Really Telling You
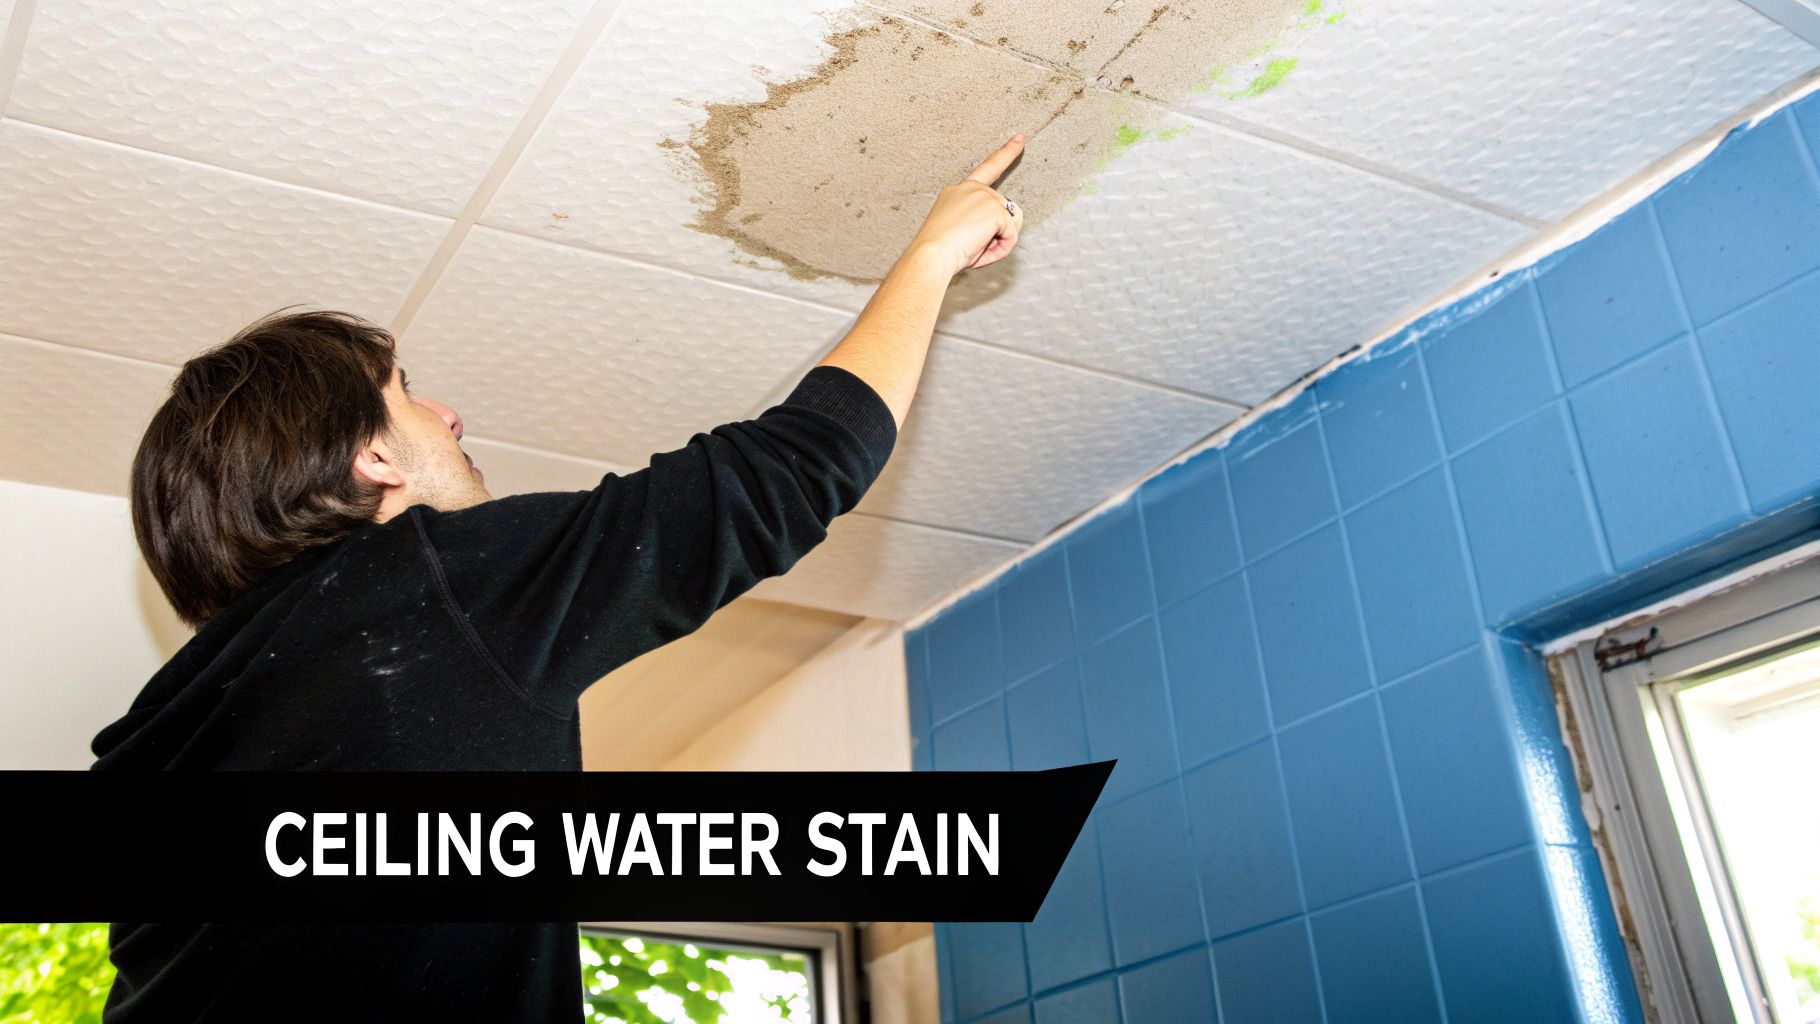
Think of that damp spot as the final symptom of a problem that started in the bathroom above. It’s a clear sign that part of your shower system has failed. If you ignore it, that moisture will continue to soak into timber joists and degrade plasterboard, creating the perfect damp, dark environment for mould to thrive. The goal right now is to get a handle on the situation, contain the damage, and start playing detective.
Here in Eastbourne, we at Harrlie Plumbing and Heating see a whole range of causes, from simple silicone sealant failures in modern builds in Sovereign Harbour to hidden pipework problems in older Victorian terraces in the town centre. Whatever the property, the very first step is always the same: stop any more water from making things worse.
Taking Immediate Action
Your first job is damage control. If water is actively dripping, stick a bucket underneath to catch it. A great tip is to place a sturdy board or an old tray inside the bucket to help spread the weight and prevent the soggy plasterboard from collapsing under the pressure.
Next, you need to cut off the water. If the leak only happens when the shower is running, the solution is simple: stop using that shower. But if you think it might be a constant drip from a pipe, you’ll need to shut off your home's main water supply. You’ll usually find the stopcock valve under the kitchen sink or tucked away in a utility cupboard. Taking these quick steps can save you a world of pain and expense while you figure out what’s gone wrong.
A shower leak is much more than an inconvenience; it's a serious financial risk. In the UK, the average cost to repair ceiling water damage can run anywhere from £1,400 to £1,700. The final bill often depends on how tricky it is to find and fix the source of the leak. To get a better idea of the potential costs, it's worth reading up on typical ceiling repair costs.
Here at Harrlie Plumbing and Heating, we’ve seen firsthand how quickly these situations can get out of hand in Eastbourne properties. A small, persistent drip can saturate ceiling insulation and rot timber joists over a matter of weeks, turning what could have been a simple fix into a major structural repair. Trust us, acting fast is always the cheapest solution in the long run.
Finding the Source of Your Shower Leak
With the immediate drip contained, it’s time to put on your detective hat. A shower leaks through ceiling situation is a process of elimination, and the trick is to start with the most obvious culprits before assuming the worst. More often than not, the source isn't a dramatic burst pipe behind the wall but a much simpler failure in the visible parts of your shower enclosure.
To begin your investigation, you need to thoroughly dry the entire shower area first. This methodical approach ensures you're not chasing your tail, trying to find a leak in an already wet environment.
Checking the Obvious Suspects First
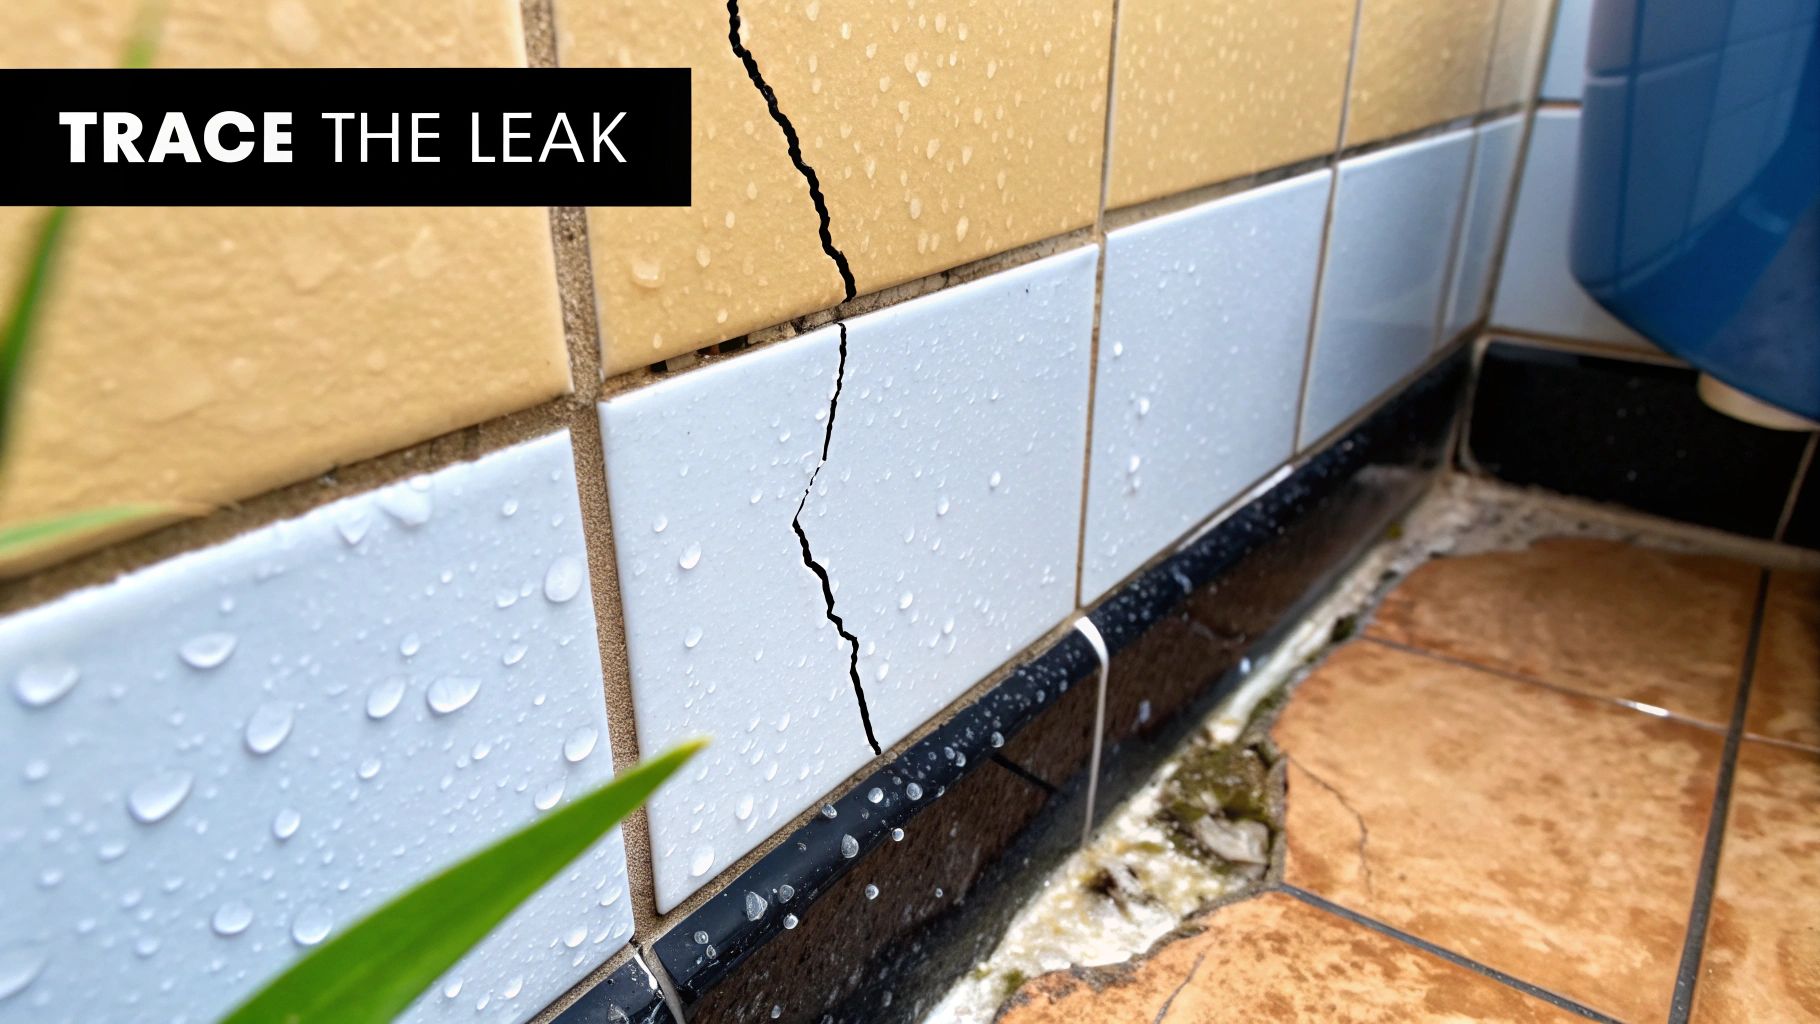
The first and most common point of failure is the silicone sealant around the base of the shower tray or bath. Over time, this sealant can shrink, crack, or pull away from the wall, creating tiny gaps where water can escape with ease.
Run your finger along the sealant line – does it feel firm and solid, or is it soft and peeling? Look for any discolouration or signs of mould, which are dead giveaways that moisture has been getting behind it for some time. Similarly, inspect the grout between your tiles. Grout is porous and can degrade, especially if it wasn't sealed correctly, so look for any hairline cracks or sections that are crumbling away.
To test these areas systematically, here are a couple of methods we use at Harrlie Plumbing and Heating:
The Splash Test: Using the shower head on a low setting, direct the water only against the shower screen and walls. Make sure to avoid the tray and drain completely. If the leak appears below after a few minutes, the problem is likely with the screen's seal or the tile grout.
The Tray Test: Plug the drain and carefully fill the shower tray with an inch or two of water. You can even add a few drops of food colouring to make it easier to see where the water is tracking. Let it sit for 15 minutes. If a drip appears on the ceiling, the leak is almost certainly from the seal around the tray or a crack in the tray itself.
An Eastbourne Case Study: A Tiny Crack Causes Big Problems
We recently visited a Victorian terraced house in the Old Town area of Eastbourne where the owner was dealing with a persistent damp patch. The sealant looked perfect, and the tray test showed nothing. It was only after a meticulous inspection that our Harrlie Plumbing and Heating engineer found a single, almost invisible hairline crack in the grout on a small tiled shelf inside the shower.
Every time the shower was used, a tiny amount of water seeped into this crack, ran down behind the tiles, and pooled on the plasterboard below. Over months, this small failure caused significant damage that required a section of the ceiling to be replaced. This highlights why a thorough, step-by-step check is so critical.
Investigating Hidden Components
If the visible seals and grout seem fine, the next step is to check the plumbing connections. This includes the shower valve trim plate (the decorative cover behind the handle) and the waste pipe connection under the tray.
Try carefully running water down the drain using a bucket, avoiding any splashing on the tray or walls. If the leak starts now, the issue lies with the waste pipe or its connection to the tray.
If you're still drawing a blank after these checks, the problem may be with the supply pipes behind the wall. At this stage, it’s wise to bring in a professional, as further investigation requires more specialised tools and expertise. The team at Harrlie Plumbing and Heating can help pinpoint these hidden issues without causing unnecessary disruption.
Right, you’ve either found the leak or you’re still playing detective. Either way, that spreading damp patch on your ceiling needs immediate attention. Acting fast is key to stopping a minor headache from turning into a full-blown renovation nightmare.
First things first, let’s manage the water. If you've got a steady drip, grab a bucket and place it directly underneath. But here's a pro tip from our team at Harrlie Plumbing and Heating: waterlogged plasterboard is incredibly weak. A bucket full of water can get heavy fast, and the last thing you want is for it to crash through the ceiling. To avoid this, pop a small piece of plywood or even a large, flat dinner plate inside the bucket. This helps spread the weight and gives the weakened ceiling a bit more support.
With the drip contained, you need to stop the flow of water at its source. The goal is to shut off the water supply to the shower. If you're not sure which valve controls what, the safest and quickest solution is to turn off the water to your entire house at the mains. If you've never done it before, don't worry—our simple guide on how to turn off your water main walks you through it.
Starting the Drying Process
Once the water is off, the race against damp and mould begins. Trapped moisture creates the perfect environment for mould to thrive, and here in the damp coastal air of Eastbourne, we see it all the time. Mould isn’t just an ugly stain; it can seriously affect your home's air quality and lead to health problems.
Get some air moving through the space immediately. Open the windows in the room below and in the bathroom upstairs. If you have a dehumidifier, now is its time to shine. Set it up along with a few fans to actively pull all that moisture out of the ceiling, walls, and air. This is a non-negotiable step to prevent long-term structural damage.
It's crucial to understand that these are just stop-gap measures. They’ll contain the mess, but they won’t fix the leak. You still need a professional to properly diagnose the root cause and repair it for good.
The health risks tied to damp living conditions are no joke. A shocking 27% of UK homes struggle with damp-related issues, which are known to cause respiratory illnesses and even affect mental wellbeing. The problem is so widespread that it costs the NHS an estimated £1.4 billion every single year to treat conditions linked to poor housing. You can read more about the impact of damp in UK homes on this website.
This just goes to show that fixing a shower leak is about more than just protecting your property—it’s about protecting your family's health. Now that you've got the immediate situation under control, it's time to think about a permanent solution.
Deciding Between a DIY Repair and Calling a Pro
So, you have a solid idea of what’s causing that pesky shower leak through the ceiling. Now comes the big decision: do you roll up your sleeves and tackle it yourself, or is it time to call in a professional? The urge to save a bit of cash with a DIY fix is always tempting, but it’s crucial to be honest about your skills and the very real risks involved.
A DIY repair gone wrong can quickly escalate a small, manageable leak into a full-blown flood. Trust us, that’s a fast track to far more damage and expense than you started with. We at Harrlie Plumbing and Heating have seen it happen in Eastbourne properties where a poorly applied bead of silicone has sneakily channelled water straight into a wall cavity, leaving the timber frame to silently rot away for months.
This simple infographic can help you visualise the decision process, weighing up how complex the job is against the potential fallout.
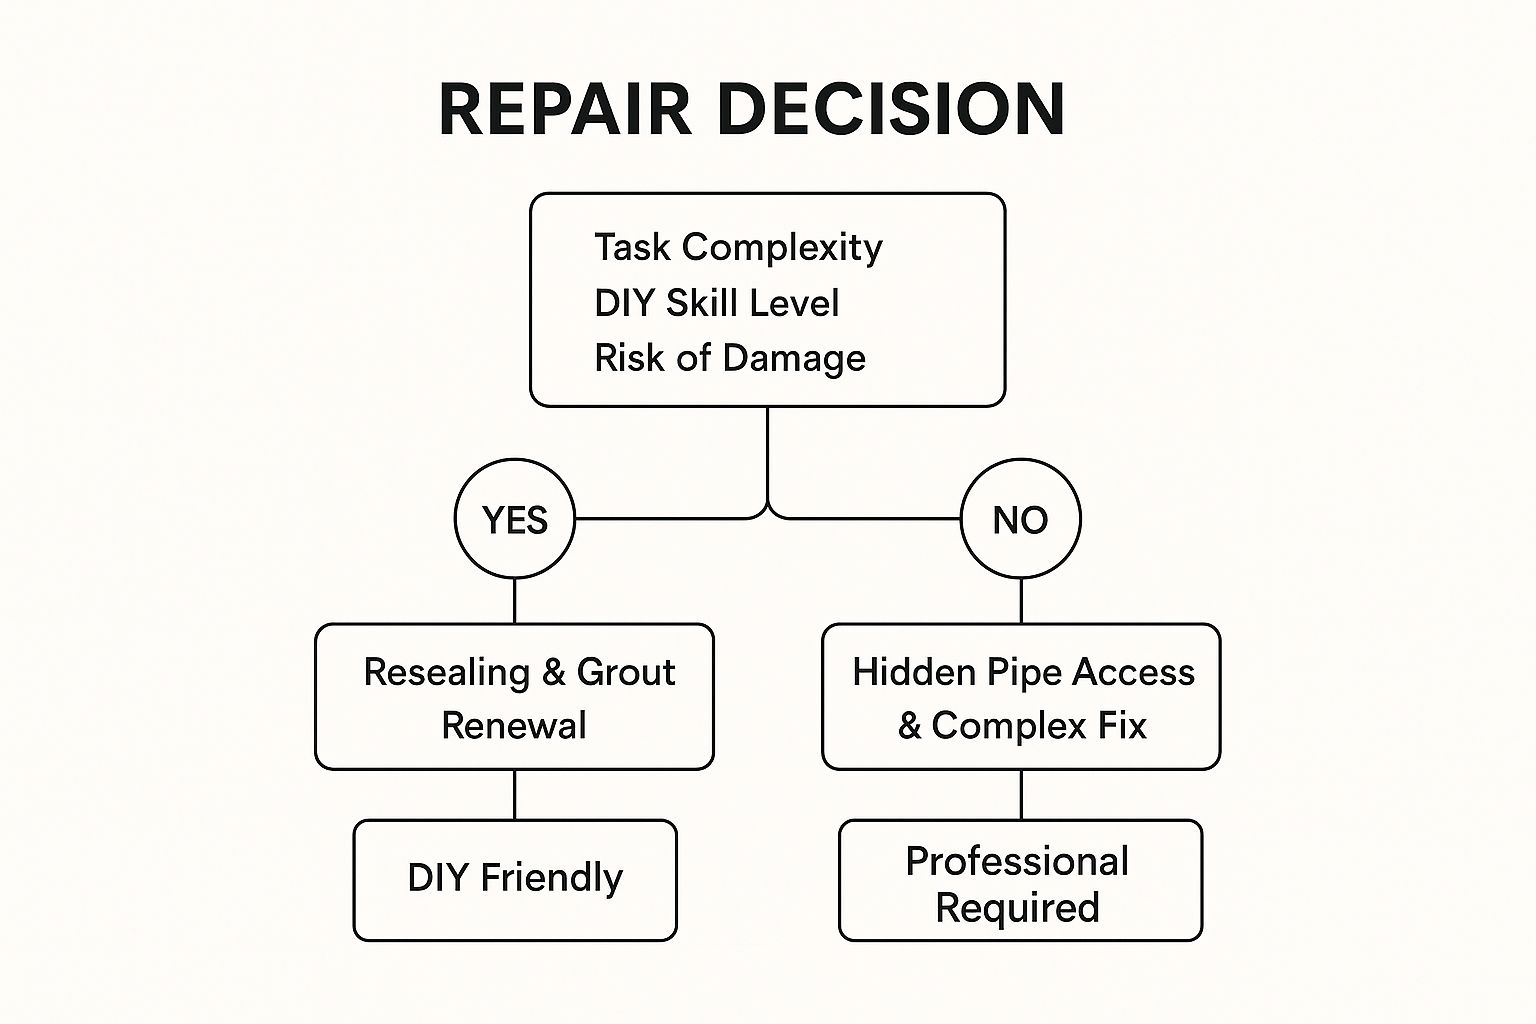
As you can see, the choice often boils down to one simple question: is the problem out in the open, or is it hidden behind walls and floors?
When DIY Is a Sensible Option
Some jobs are definitely within reach for a confident DIYer. If your detective work points towards tired old sealant or crumbling grout, these are tasks you can probably handle with the right tools and a bit of patience.
Resealing a Shower Tray: Applying a fresh, high-quality silicone sealant around your shower tray or bath is a perfect weekend project.
Replacing Grout: If you’ve spotted cracked or missing grout, raking out the old stuff and applying new waterproof grout will create a solid, reliable seal.
A quick tip from the Harrlie Plumbing and Heating team: preparation is everything. The secret to a lasting DIY seal is to get rid of all the old, failed material and make sure the surface is completely clean and bone-dry before you apply anything new.
When to Call a Professional Plumber
Some jobs, however, just aren’t worth the risk and are best left to the experts. If that leak is still there after you’ve resealed all the obvious spots, or if you suspect the plumbing itself is the culprit, it’s time to pick up the phone.
To help you decide, we've put together a quick guide comparing DIY tasks with jobs best left to the pros.
DIY vs Professional Plumber: A Decision Guide
Repair Task | Recommended for DIY? | Why Call a Professional? | Typical Tools Required |
|---|---|---|---|
Resealing Shower Tray | Yes | N/A - A straightforward task. | Silicone gun, sealant removal tool, utility knife, cleaning supplies. |
Replacing Grout | Yes, with care | Large areas or if you're not confident. | Grout rake, grout float, sponge, bucket. |
Fixing a Leaky Tap | Maybe | Complex cartridge taps or if unsure. | Spanner set, screwdrivers, replacement washers/cartridge. |
Hidden Pipe Leaks | No | Requires accessing pipes behind walls/floors, specialist tools, and expertise to avoid major damage. | Pipe cutters, soldering equipment, access saws, moisture meters. |
Shower Valve Repair | No | High risk of flooding if done incorrectly; complex internal mechanics. | Specialised valve tools, spanners, soldering kit. |
Diagnosing an Unknown Leak | No | Pros have diagnostic tools (e.g., thermal cameras) to find the source without destructive searching. | Moisture meters, thermal imaging cameras, pressure testers. |
Ultimately, if you're ever in doubt, calling a professional is the safest and often most cost-effective choice in the long run.
For persistent or complicated shower leaks, the most reliable solution is often to contact professional plumbing services. A certified plumber has the right diagnostic tools and years of experience to track down hidden leaks without turning your bathroom into a demolition site.
Consider calling a pro for:
Hidden Pipework Issues: Leaks from supply or waste pipes tucked away behind tiles or under the floor need a professional touch to access and repair properly.
Faulty Shower Valves: A dripping mixer valve hidden in the wall is a tricky job that can cause a major flood if you get it wrong.
Plain Old Uncertainty: If you’re not 100% confident about where the water is coming from, a professional diagnosis will save you a world of time, money, and stress.
Here at Harrlie Plumbing and Heating, our team is fully equipped to handle these complex situations across Eastbourne and the surrounding areas. We can accurately pinpoint the source of your shower leak and deliver a permanent, reliable fix. If you're weighing your options, our guide to finding a trusted plumber in Eastbourne is a great place to start.
Long-Term Fixes and Future Leak Prevention
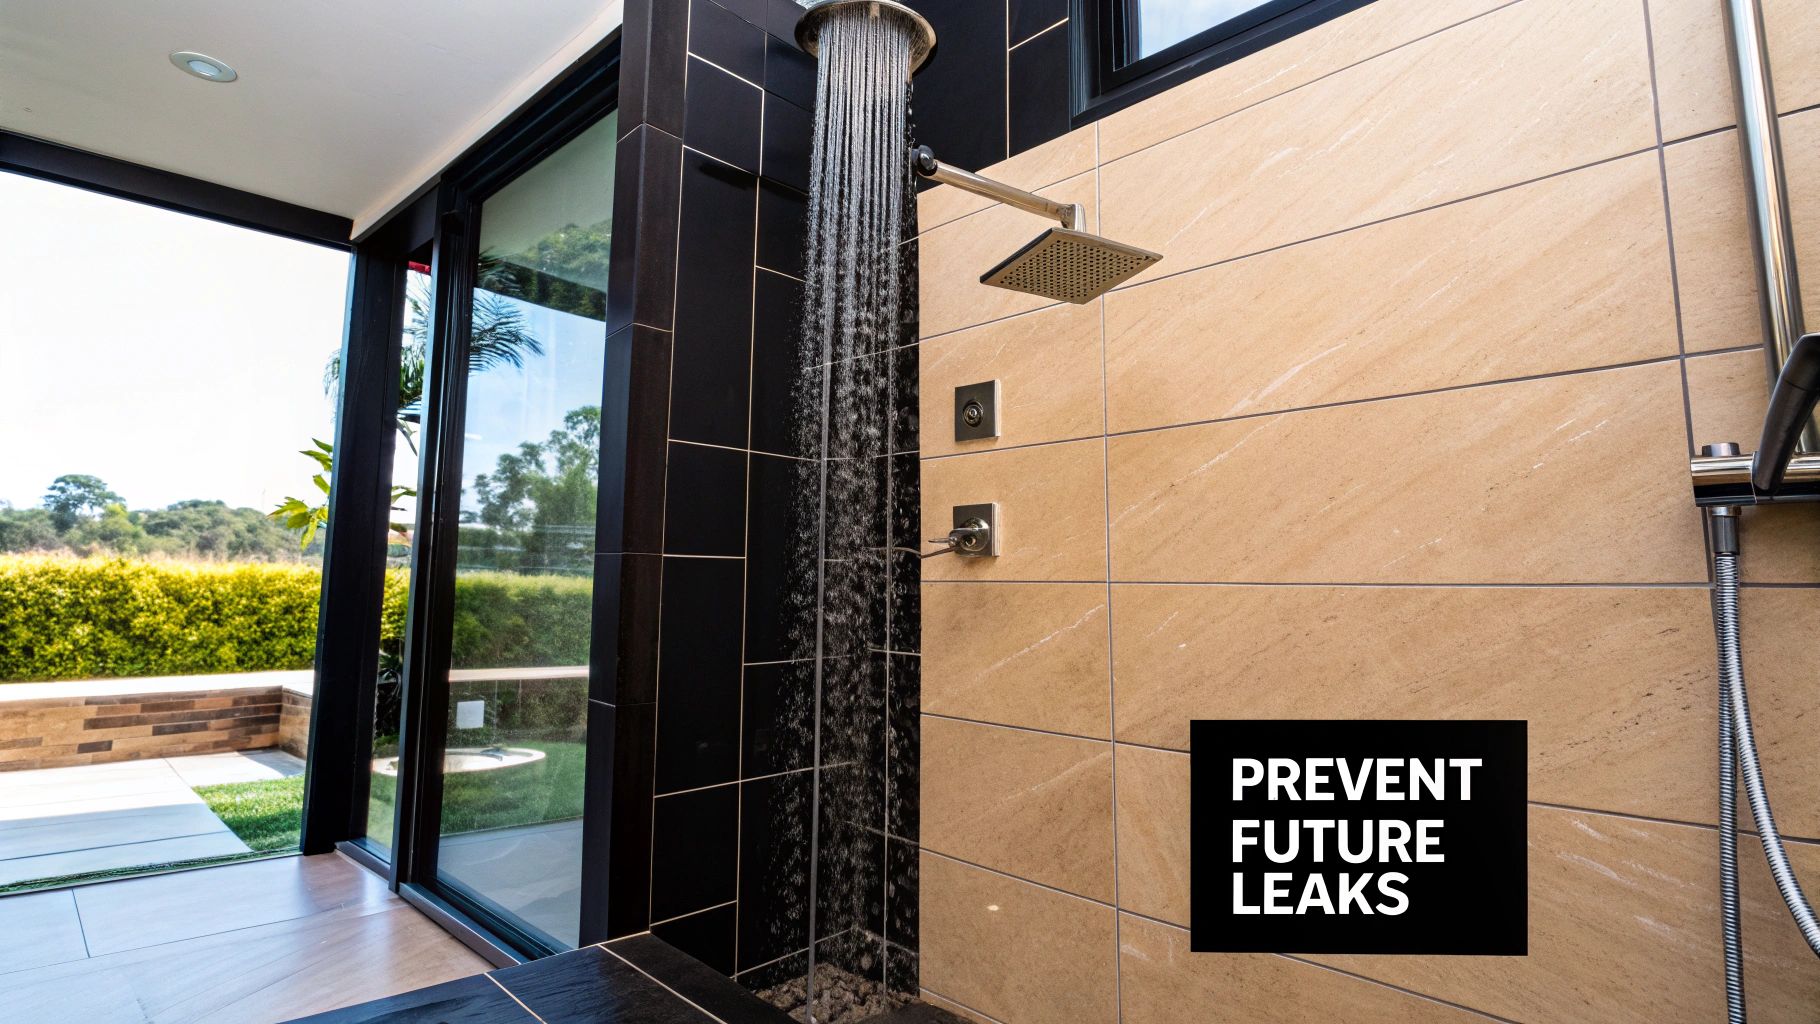
Fixing the damage from a shower leaks through ceiling situation is a huge relief, but your job isn't quite done yet. The real win is making absolutely sure it never happens again. A bit of proactive maintenance and using the right materials from the get-go are your best lines of defence, saving you a world of stress and money down the line.
The foundation of any leak-proof shower is its waterproofing. When you're repairing or renovating, this is not the place to cut corners. Always opt for a high-quality, flexible silicone sealant designed specifically for bathrooms. Unlike cheaper options, it’s built to resist shrinking and cracking, which means it will hold a watertight seal for years. The same goes for grout—choose a waterproof epoxy grout over the standard cement-based stuff for far better durability.
Building a Routine for a Dry Home
A little bit of regular attention can head off the vast majority of leaks. Getting into a simple maintenance habit is genuinely the most effective long-term strategy. We always advise our Eastbourne clients at Harrlie Plumbing and Heating to pop a reminder in their calendars every few months to run through these quick checks.
This simple routine can make all the difference:
Inspect Your Sealant: Once a month, give the silicone around your shower tray and screen a proper look. You’re searching for any signs of peeling, shrinking, or black mould spots, which are tell-tale signs the seal is starting to fail.
Check Your Grout: Scan the tile grout for any hairline cracks or crumbly bits. Pay special attention to the corners and any areas that take a direct hit from the water spray.
Keep Drains Clear: A slow-draining shower is a massive red flag. A simple drain protector will catch hair and soap scum, so make a habit of clearing it out regularly to stop blockages that can cause water to back up and overflow.
Modern Solutions for Lasting Protection
For homeowners with older properties, which we see a lot of in areas like Bexhill and Hastings, a bathroom renovation is the perfect chance to seriously upgrade your waterproofing. Modern tanking systems have come a long way. They involve applying a waterproof membrane or a liquid coating directly to the walls and floor before any tiles go on, creating a completely sealed, tank-like enclosure. It’s a truly robust solution that offers total peace of mind.
Building standards are also getting smarter about tackling damp. Evolving UK safety regulations are now putting a much stronger emphasis on proper waterproofing in bathrooms and wetrooms to minimise leaks and protect the building's structure long-term.
Once you’ve sorted the leak and everything is bone dry, it's vital to make sure no lingering dampness causes other problems. You can find some excellent tips on how to prevent mould in your bathroom to keep the space healthy and clean.
For more in-depth advice on what to do when you spot water damage, have a look at our comprehensive homeowner's guide to repairing water leakage.
Your Questions About Leaking Showers Answered
When you're staring at a damp patch on your ceiling, a dozen questions can race through your mind. It's a stressful situation, no doubt about it. But getting clear, straightforward answers can help you make the right decisions quickly. Let's tackle some of the most common queries we hear from homeowners in Eastbourne.
How Can I Tell If The Leak Is From The Drain Or The Pipes?
This is the classic diagnostic question, and thankfully, there's a simple way to get a good idea of what's going on. The trick is to isolate the different parts of the shower.
First, make sure the shower tray is completely dry. Then, get a bucket of water and pour it directly down the drain. If the ceiling below starts dripping again, the problem is almost certainly with the drain fitting itself or the waste pipe connected to it.
If nothing happens after the bucket test, the next step is to run the shower itself. Turn on the shower head and let the water flow. If the leak only appears now, the issue is likely with the supply pipes or the mixer valve hidden behind the tiles.
Of course, if you're still not sure, our team at Harrlie Plumbing and Heating can use professional diagnostic tools to pinpoint the source without causing any unnecessary damage to your property.
Is It Safe To Use Lights In A Room With A Wet Ceiling?
Absolutely not. This is extremely dangerous. Water and electricity are a lethal combination, and you should never take a risk. If you see water anywhere near your light fittings, you must immediately turn off the power to that entire circuit at your consumer unit (or fuse box).
Safety First: Don't even think about touching wet light switches, sockets, or any electrical fixtures. Even after the leak is fixed and the ceiling looks dry, it's essential to have a qualified electrician inspect the wiring. They need to confirm it's safe before you restore power.
The Drip Has Stopped On Its Own. Should I Still Be Concerned?
Yes, you should be very concerned. A leak that stops and starts is a common trap that catches homeowners out, and ignoring it is a surefire way to guarantee a much bigger problem later on. We see this often in Eastbourne; a leak might only appear during heavy rain if a seal is failing elsewhere, but the underlying issue remains.
Often, a leak will only occur under specific conditions—like when the shower runs for a long time or when water splashes against a particular weak spot in the grout. Just because the dripping has paused doesn't mean the problem is solved.
All that moisture that has already escaped is now trapped in your ceiling void, slowly rotting timber joists and creating the perfect breeding ground for mould. It's critical to find and fix the source, even if the visible drip has stopped.
If you're dealing with a shower leak or have more questions, don't leave it to chance. Contact the trusted professionals at Harrlie Plumbing and Heating for a fast, reliable solution. Visit our website to book a call-out today.

Comments